Saturday, May 30, 2009

Coconut Crisp French Toast


What better way to celebrate being finished classes and exams as well as getting over a horrible cold (one which I truly believed was Swine Flu) than indulging in a decadent breakfast of Coconut Crisp French Toast. Let me tell you, this is no regular french toast. French toast is truly a delicacy on it's own, but this little number takes french toast to a whole new level! Coating the egg drenched bread in shredded coconut before frying gives the french toast a delicious light and crispy exterior which contrasts wonderfully with the soft and moist interior of the toast. How do you make this already sensational dish even better? Stuff the toast with Nutella before dipping in the egg! I dare you to turn this breakfast down.
Tip: to add extra points for presentation, lightly dust the french toast with icing sugar and shredded coconut.
Tip: frying with butter adds great colour and flavour, but butter can burn very easily. To prevent this, add a little oil to the pan as well.

Ingredients:
2 thick slices egg bread (challah)
2 eggs
2 - 3 tbsp milk
2 - 3 tsp cinnamon
1 tsp nutmeg
1 1/2 - 2 tbsp Nutella chocolate hazelnut spread
unsweetened shredded coconut (enough to coat 2 slices of bread)
butter and oil for frying

Directions:
1. Cut the 2 thick slices of bread into triangle halves. Using a small serrated knife (a steak knife works well), carefully cut a small pocket in the middle of each half of bread. Carefully spread Nutella inside pocket of bread, being careful not to tear the bread. Set aside.

2. In a small bowl, whisk eggs with milk, cinnamon, and nutmeg. Pour mixture into a shallow dish, large enough to fit bread. In a separate shallow dish, (also large enough to fit bread) pour in desired amount of coconut (you will need enough to coat each bread slice). Dredge each slice of stuffed bread in egg mixture and then transfer to coconut dish, and coat thoroughly in coconut. Repeat with all slices of bread.

3. In a frying pan or griddle on medium-high heat, melt oil and butter. Place coated bread in pan and fry until browned evenly on each side. Serve with maple syrup.
Monday, May 25, 2009

Cherry Tomato and Roasted Red Pepper Couscous Salad


It's that time of year! The time to bring out that salad cookbook and starting thinking light and healthy. I don't want to hear anyone groaning over the idea of eating light and healthy! Healthy meals can be satisfying and full of big bold flavours that will make you forget all about your idea, and simply enjoy delightful summer cuisine. Sure this time of year people naturally begin to think about eating better in order to feel confident with their body in minimal summer clothing, but I think about how much easier it is to eat healthier in the summer. Think of all the wonderful flavours that appear in the summer, from seasonal fruit and vegetables, to having a full herb garden growing in your backyard. It's just so much more simple to add flavour to a meal this time of year, and honestly, who wants to eat a great big carb-filled meal in the heat anyway?

This couscous salad is great for a snack and even better as a side dish for fish or chicken. Couscous is tiny little pieces of pasta, so you will feel satisfied after eating it, but because couscous is best friends with vegetables and herbs, it can easily become an extremely healthy dish! Couscous is super simple to make and is very versatile allowing for you to experiment with all different types of flavours. I got this recipe from Williams Sonoma but altered it slightly to have not only freshly chopped mint, but parsley as well. Next time you're at the grocery store, take a look in the prepared foods section to get ideas on what to add to your next homemade couscous. Experiment!
Tip: Use bought roasted red peppers (jarred and soaked in oil) instead of roasting your own. Keep the jar handy in your fridge to add to other recipes.
Tip: For a beautiful presentation, spoon a large scoop of couscous in the centre of a plate, and rest a piece of chicken or fish on top. Garnish with fresh herbs. You'll be sure to impress your friends serving this up!

Ingredients:
2 cups water
1/4 cup plus 1 tsp olive oil
1 tsp salt
2 cups instant couscous
1 1/2 roasted red bell peppers, peeled and seeded and coarsely chopped
1 1/2 cups cherry tomatoes
1/4 cup chopped fresh mint and parsley
1/4 cup orange juice
1 tbsp grated orange zest
3 tbsp red wine vinegar

Directions:
1. In a saucepan over high heat, combine the water, the 1 tsp. olive oil and 1/2 tsp of the salt and bring to a boil. Pour in the couscous stirring constantly, then remove from the heat. Cover and let stand for 15 minutes. The liquid will be fully absorbed and the couscous will have plumped.

2. Transfer the couscous to a large serving bowl. Using a fork, fluff the couscous grains to separate them. Add the bell peppers, tomatoes, chopped mint and parsley, orange juice, orange zest, the 1/4 cup olive oil, vinegar, and remaining 1/2 tsp salt. Mix gently but well. Cover and refrigerate for at least 1 hour or up to 12 hours before serving to allow flavors to blend.

Budget Friendly Wines


How many times have you gone into the liquor store in hopes of finding the perfect bottle of wine to spice up your evening, but end up settling on a wine far less than perfect simply because of it's price tag? I don't know about you, but this has become a regular occurrence for myself and many of my friends. We end up purchasing the cheapest bottle in the store and once we have taken our first sip, discover how simply unbearable to wine is and up either pouring it down the drain, or find some sort of chaser to take after each sip in order to tolerate it. Well my friends, this problem can end right here and now! Here is an awesome article written by Angela Aiello for Steven and Chris.  The article lists five different budget friendly wines, a description of each wine, a suggested food pairing, and tips on the scenario for enjoying the wine.  So the next time you stop into your local liquor store, refer to this list and there will be no need to pour any wine down the drain or chase every sip! 

Angela is one part of "Toronto's Hottest Social Wine Club," the iYellow Wine Club, who, along with her partner Paxton Allewell, are helping to get Toronto enthusiastic about wine and wine culture by holding monthly wine events, wine tours, and newsletters.  Their extensive wine knowledge combined with their undeniable charm makes the iYellow Wine Club a wonderful resource for young people to turn to to get excited and learn about wine.  Become a member today!

Image courtesy of www.winexpert.com.

Thursday, May 21, 2009

Chicken Quesadilla


Tortillas are a great staple to have around the house.  They are a wonderful substitute for bread for breakfast, lunch, dinner, and snack...come to think of it, you could even make some really interesting desserts out of tortillas as well! Quesadillas are one of the easiest and fastest things that you can make out of a tortilla and because the options for fillings for quesadillas are endless, you can prepare a different kind each day and never get bored! 

The quesadilla I made today was just a way to use up some leftovers in the fridge. I picked flavours and textures that would compliment one another, layered them into the tortilla, and heated it in the oven for a few minutes.  Does it get any easier than that? Well actually it can. You can also heat your quesadilla in the microwave instead, but this lacks the great crunch of the tortilla that results from being in the oven. There is no recipe needed for quesadillas all you need is imagination! Play around with different flavours and use your judgment on how much to put inside.  
Update from 12/06/09: I made chicken quesadillas again today and found that the flavour was heightened to a whole new level when I sauteed some of the ingredients beforehand.  I made a quesadilla with all the same ingredients listed below but added chopped onions, roasted red peppers, and red pepper flakes.  I sauteed the onions, peppers, and pepper flakes with the jalapeno peppers and corn niblets just until onions were lightly browned. 

In this quesadilla I put:
  • Sliced cooked chicken
  • Refried beans
  • Corn niblets (freshly cut from the cob)
  • Cheddar cheese
  • Monterey Jack cheese
  • Chopped jalapeno peppers

Monday, May 18, 2009

Food2 Gift Basket


My gift basket that I won from Food2 arrived in the mail last week! Nothin' like free stuff when you're a student struggling to make ends meet...but it kind of looks like they invaded the food aisle at the dollar store.  I was very happy to see Ring Pops, Moon Pie's, and Froot Loops....but Spam?...really? Personally, I don't think that putting Spam in a gift basket is the best move for an online food channel's reputation.

Spinach and Goat Cheese Bundles


When was the last time I posted an entry with a recipe in it?! Time has not been on my side the past few weeks, as I have been struggling to finish up my final weeks of school. I have turned into the typical University student relying on my parents to cook for me or rummaging through my fridge to eat whatever is fastest so that I have time to read one more play or write one more essay, and I don't think that cereal or toast would be a very thrilling entry.

Luckily last night my sister had pulled out a package of phyllo pastry from the freezer to thaw and had saved the leftovers for me to use! When I know I have the option of cooking or baking with phyllo it's like a lightbulb goes off in my head as I brainstorm the endless possibilities of how you can fill this flaky buttery pastry! Because I was still conscious of time and being economical to use what was in my fridge, I decided to pull out the convenient, yet nutrient rich, frozen spinach from the freezer. Adding a little onion to the mix, some spice, and my good friend goat cheese, we have got a delicious, simple, and quick dinner on our hands...and one that Popeye would love!
Note: Phyllo pastry can, at times, seem very frustrating to work with but don't worry, although the sheets of dough are extremely delicate, they are also very forgiving. If there is a rip or tear in one sheet, don't fret because you are just going to layer another sheet right on top! No one will know!
Note: Even though the pastry is layered in butter, this is still a healthy dish because of the amount of spinach in it. Spinach is very high in iron and fiber, which helps to build muscle and protects against weight gain and heart disease.
Tip: Experiment with different fillings for your phyllo bundles. Try adding your favourite nut into the mix. Pine nuts would taste delicious with this filling in particular.

Ingredients:
about 8 sheets of phyllo pastry
3/4 cup water
1 package of frozen spinach
1/2 of an onion (chopped)
1/3 - 1/2 cup goat cheese (depending on your taste)
1/2 tsp red pepper flakes
olive oil for frying
salt and pepper to season
melted butter for brushing onto pastry

Directions:
1. In a frying pan set to medium high, add 3/4 cup water and boil. Once boiling, add spinach and break up with a spatula or fork. Once, thawed, transfer to a colander and drain well.

2. While spinach is draining, heat olive oil in the same pan and add onion and red pepper flakes. Cook, while stirring, until onion becomes soft and almost translucent.

3. Add drained spinach to the pan and season with salt and pepper. Combine the ingredients together in the pan. Remove from heat.

4. Prepare phyllo pastry by carefully, brushing each layer with melted butter. You will need 5-6 layers of dough. Carefully cut the dough so that you have 2 long rectangles of about 6 inches width.

5. Add desired amount of filling to corners at the end of each rectangle and cut slices of goat cheese to place on top. Fold pastry and filling into triangles. To learn how to fold your dough into triangles, see here. Repeat the pastry preparation until filling is used up (about 4 large bundles).

6. Place triangles on a baking sheet and bake in a 350º oven for about 10-15 min, or until bundles are slightly browned.

Thursday, May 14, 2009

More Pics from the Wine Awards


Host Kevin Brauch
Kevin doing the triple-blindfolded champagne bottle opening with a knife
Pouring champagne for the happy couple who got engaged AT the event!
Kevin singing happy birthday to Tony Aspler 

Me (Danielle Rose), Sandy Kurbis from Forefront Communications, Kevin, and Patricia Crease from Forefront Communications

Photos courtesy of photographer Stephen Elphick

Tuesday, May 12, 2009

Ontario Wine Awards 2009


Queen's Landing


Host Kevin Brauch, Chef James Olberg, me (Danielle Rose), David Rose of Forefront Communications

Host Kevin Brauch, Chef James Olberg, Sandy Kurbis of Forefront Communications, me

in the kitchen


the first course ready to be served

one of the dining tables
first course
second course
third course
fourth course
dessert selection


amaaaaazing cheesecake!!

On Friday evening I had the privilege of attending the 2009 Ontario Wine Awards in Niagara.  The awards were founded in 1995 by Tony Aspler as a way to recognize the growth and quality of the Ontario wine industry.  The growth of the Ontario Wine Awards led to the creation of 'sip Ontario', a program developed to publicly showcase VQA award-winning wines.  Eventually 'sip Ontario' partnered up with Savour Ontario (a program developed by the Ontario Ministry of Agriculture, Food and Rural Affairs) to bring the finest Ontario VQA wine and local food together.  The event is a way to bring together a warm community of Ontario winemakers to celebrate their achievements with an evening of entertainment, delicious food, and, of course, award-winning Ontario VQA wine.  

This year's event took place at Queen's Landing and was hosted by Kevin Brauch of the Food Network's The Thirsty Traveler and Iron Chef America.  Kevin used his wit and charm to keep the crowd enthused throughout the awards, adding a whole other layer to the event.  He even did an exciting demonstration of a triple-blindfolded champagne bottle cork removal with a knife, commonly known as sabering!  Prior to the awards, there was a Sparkling Wine Reception where guests could mingle while tasting a fine selection of Ontario Cheeses sponsored by Dairy Farmers of Canada.  The elaborate four course meal was prepared by Queen's Landing executive chef James Olberg, with each course highlighting four of the award-winning wines.  The menu was as follows:
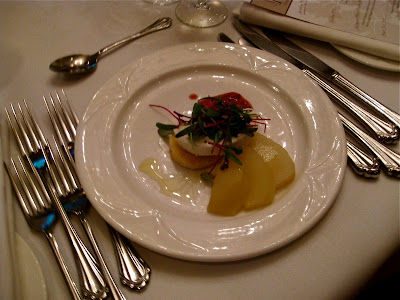
  • Ontario Woolwich goats cheese with sous Vide pears and warm brioche, paired with Thirty Bench 2007 Riesling
  • Smoked Ontario candied artic char with leek soubise and slow cooked Niagara Baby Leeks with Niagara prosciutto, paired with Creekside Estate 2007 Reserve Sauvignon Blanc
  • Niagara honey roasted chicken with a walnut rosemary crust, Krinkle Cress and Hot House tomatoes with a Niagara Pinot Noir and honey glaze, paired with Tawse 2007 Cherry Avenue Vineyard Estate Bottled Pinot Noir
  • Roasted AAA corn fed Ontario beef tenderloin with potato and braised Ontario beef short rib Pavé, vegetable pot-au-feu infused with roasted garlic Cabernet Franc wine reduction, paired with Colio Estate 2005 Reserve Cabernet Franc 
I had such a spectacular night, I didn't want it to end! The good news is...the excitement continues on June 16th with sip & Savour Ontario, an event open to consumers.  I have attended this event several times before and it has been a pleasure attending each year!  The event is a continuation of the Ontario Wine Awards where award-winning VQA wines from more than 25 Ontario wineries are paired with elegant and delectable offerings of regional cuisine prepared by local Savour Ontario chefs.  There are also live culinary demonstrations (my personal favourite) throughout the evening made to inspire people to buy local produce.  The event takes place on Tuesday June 16th in the Distillery Historic District from 7:00 pm - 9:30 pm.  For tickets and information visit www.ontariowineawards.ca.  I hope to see you there!

Sunday, May 3, 2009

Eggplant Parmesan


When you're looking for comfort food, most people turn to their favourite carb-loaded standby's like potatoes and pasta, or flavourful red meats like a great big steak. Eggplant parmesan is a great alternative comfort food. Eggplant Parmesan is traditionally breaded before it is layered with cheese and baked, but this dish can still be just as satisfying and comforting without the extra flour, eggs, and breadcrumbs. I have created my own version of eggplant parmesan that cuts back on some of the fat traditionally in the dish, while still having a bold and delicious flavour.
Tip: Sprinkling salt on top of the eggplant before baking it will allow the vegetables bitter juices to emerge out.

Ingredients:
1 eggplant (about 1 Ib/500 g)
1/4 cup olive oil
1/2 tbsp kosher salt
1 cup tomato sauce
1 cup mozzarella cheese (grated)
1/2 cup parmesan cheese (grated)
1 tsp dried red pepper flakes
1 roasted red pepper (julienned)
3/4 italian bread crumbs
1 tbsp Italian seasoning
1/4 cup fresh basil (chopped)

Directions:
1. Preheat oven to 400ºF. Cut eggplant lengthwise (discarding the ends) into 1/4 inch slices. Place them on a rimmed baking sheet one single layer. Brush both sides of eggplant slices with olive oil. Sprinkle salt over slices and rub in with your fingers.

2. Bake slices 10 minutes on each side.

3. While eggplant is baking, layer 1/2 cup of the tomato sauce onto the bottom of a shallow casserole dish. Sprinkle in red pepper flakes.

4. Layer cooked eggplant into dish. Arrange roasted red pepper slices and basil on top of eggplant. Spread the remaining 1/2 cup tomato sauce over eggplant and red peppers. Sprinkle bread crumbs, then Italian seasoning, then mozzarella, then parmesan cheese over tomato sauce.

5. Bake for another 15-20 minutes until sauce is bubbling.