Thursday, January 23, 2014

Rose's Roundup: The Allure of the Simple Dish

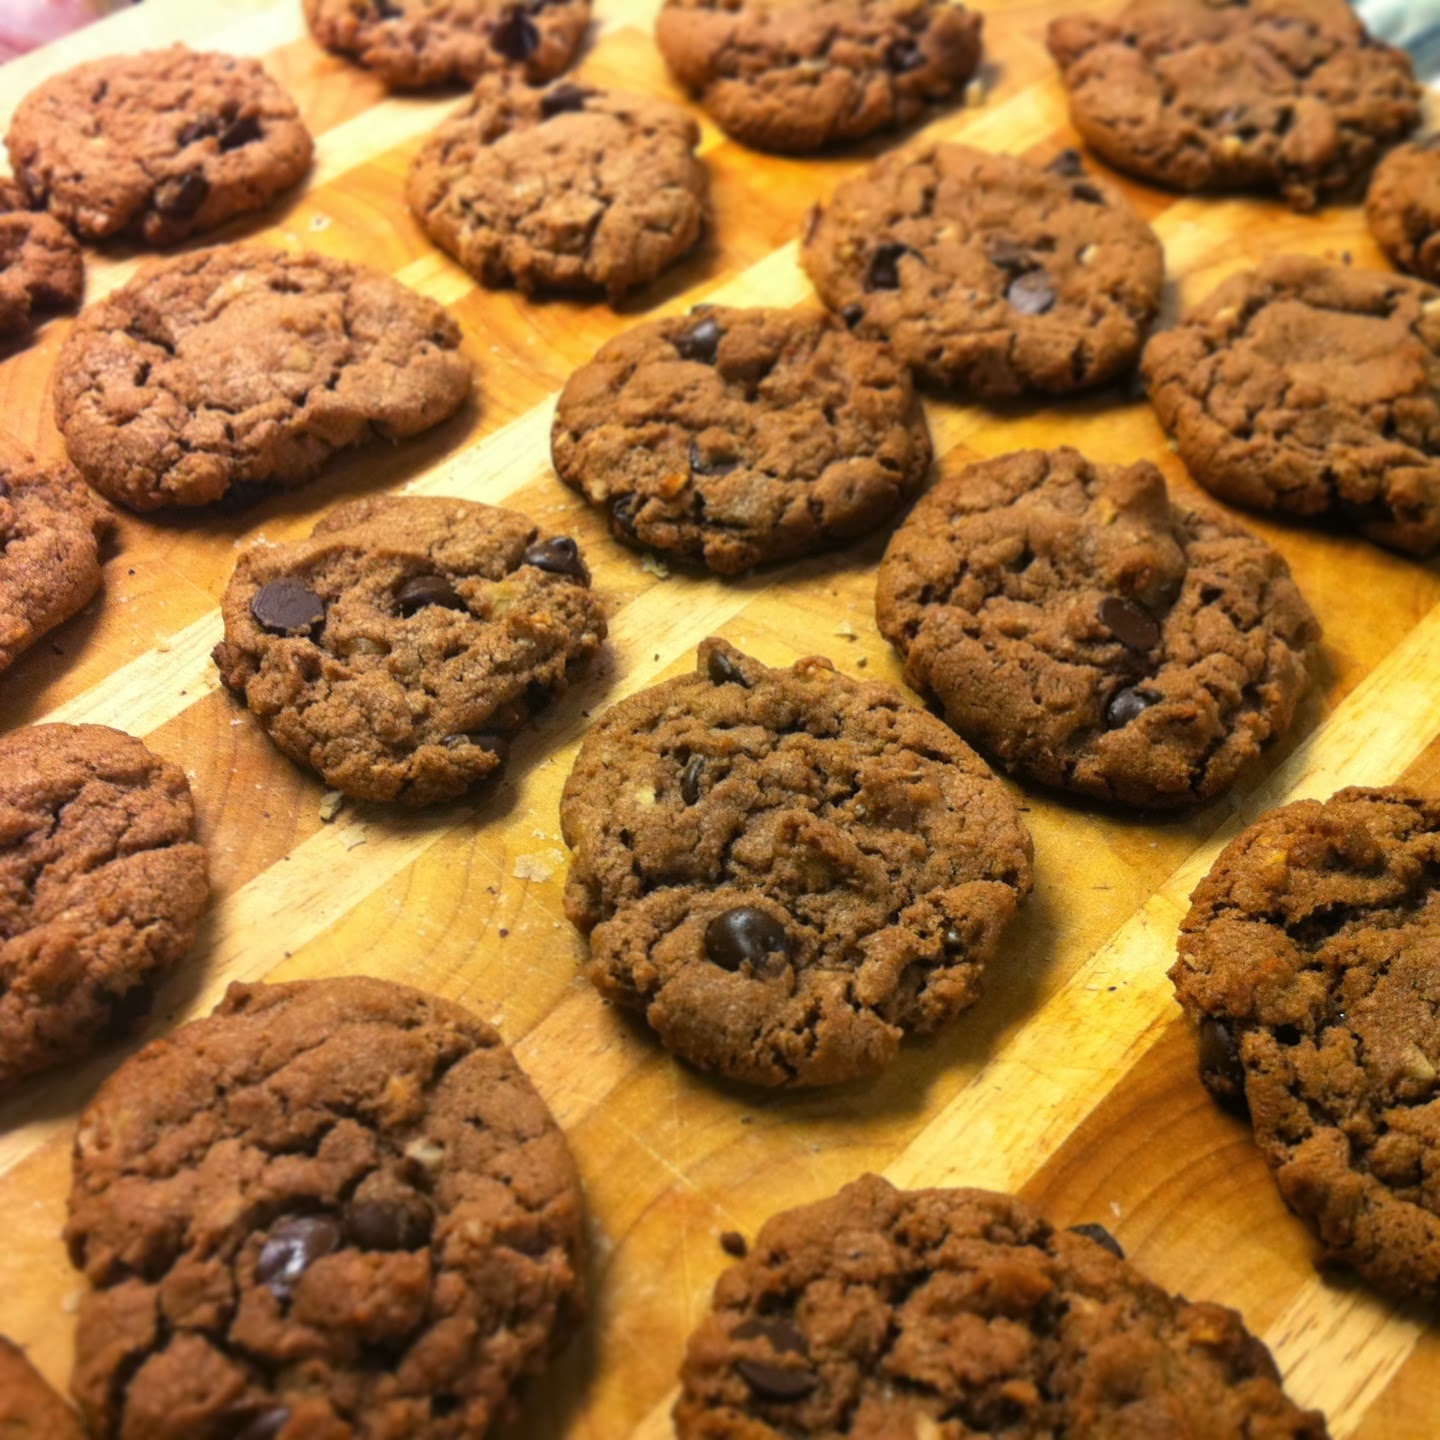
Nutella Cookies - Writing a food blog is wonderful because more often than not it encourages me to try new recipes, but the downside is I often forget to look back on some of my favourites. Giada de Laurentiis' recipe for Nutella Cookies was one of the first recipes I ever posted on my blog almost five years ago! I love this recipe for having that sweet chocolate and hazelnut pairing that we all know and love, but also for its slight bitterness, which keeps you coming back for more! Hot out of the oven these cookies are warm and gooey, but give them some time to cool and they become nice and crunchy, begging to be dunked into a glass of milk or even crumbled over an ice cream sundae. During the holidays I whipped up a batch of Giada's Nutella cookies (adjusting it slightly by adding some chocolate chips) intending to bring them to my friend Martha-In-Training's annual Ugly Christmas Sweater Party. It was just as the cookies came out of the oven that we began to get warning signs about a possible ice storm. Yes folks, I am talking about the ice storm of 2013. With a late and icy night ahead of us, and not the easiest commute to the party, we sadly abandoned our plans for ugly Christmas sweater party fun, and played it safe with a movie night on the couch. The upside? Nutella cookies ALL FOR ME!
Christmas Breakfast - Everyone celebrates Christmas with their own family a little bit different. For my family we like to do our big celebration with all of the grandparents, aunts, uncles, and cousins on Christmas eve, eating and drinking until fairly late into the night. Come Christmas morning things get a lot more relaxing, as we leisurely open gifts with just my mom, my sister, and I...and often my honorary brother D, my sisters boyfriend. With so much rush leading up to Christmas, I didn't have time to make a dish of my own to contribute to our Christmas Eve festivities, so for Christmas morning I wanted to treat my family to something special of my own. For months now my boyfriend Chris and I have been obsessing over the southern "poor-mans-food" grits, having it for breakfast on an almost weekly basis. Never having tried grits before, my mom and my sister didn't understand my newfound obsession with the seemingly bland mush. Christmas morning was my chance to get them aboard the grits train! Creamy grits filled with sharp aged cheddar is topped with crispy and salty pancetta, a runny-yolk fried egg, caramelized onions, and chopped parsley. Needless to say, all it took was one bite to get them just as hooked on grits as me! They loved it!!
Spaghetti Aglio E Olio - Why is it that some of the simplest of foods always seem to find a way into my heart? Spaghetti Aglio E Olio is one of those extremely simple, yet wonderfully alluring dishes for me. Its the comfort of the dish that grabs my attention, as well as those simple familiar flavours. I guess it's that same simplicity that drew me to grits. I find those very plain and simple dishes to be so attractive for me, because there is so much room for play and improvement. For a long time I have been making my Pasta Aglio E Olio by simply tossing my pasta with a bunch of garlic infused olive oil, a bit of red pepper flakes, and lots and lots of parmesan cheese. As much as I enjoyed that simple combination, I knew I could make it better. I knew that the flavours could be amplified and I wanted to find a way of keeping that saucy feel to the dish, without having to use such an excessive amount of oil.

Being Italian, my boyfriend Chris grew up eating Aglio E Olio, with himself and many of his friends playing around with different variations on the European classic...often after midnight, with several drinks in their system. Of course it took the Italian boyfriend to discover what may be one of the best methods of making Aglio E Olio. Chris discovered Ina Garten's recipe for Spaghetti Aglio E Olio, which utilizes the starchy pasta water to extend the olive oil and cook the garlic slices so that by the time you add your pasta to the mix, the garlic has become creamy and mixes right in with the sauce. To amp up those flavours even more, we followed Ina's recipe, but began with our own addition, salty pancetta, rendered down to crispy perfection! With Ina's method of making the perfect garlic and olive oil sauce, combined with Chris and I's pancetta addition, I think we are on our way to perfecting one of the worlds most simplest dishes!
The Great Cream Challenge: Creamy Mac & Cheese - Every year for the past few years I have had the pleasure of taking part in the Real Cream Anyday Magic Great Cream Challenge! The challenge brings together different food bloggers from all over Canada, inviting them to choose a monthly theme and create a recipe of their choice that fits that particular theme, and utilizes the extremely versatile ingredient, cream! Three bloggers each month submit their recipes to share and invite the wold to vote on which recipe they like best. This year I am very excited to be taking part in three different themes throughout the challenge, the first being the Creamy Mac & Cheese challenge.

When coming up with a creamy mac & cheese recipe of my own, I first began by brainstorming all my favourite ways to eat cheese. I wanted to create a hybrid dish that would incorporate two of my favourite cheese dishes into one. After writing out an extremely long list of yummy cheese dishes (while snacking on cheese, of course!) I came up with the idea of a French Onion Mac & Cheese, incorporating those savory, comforting flavours we know and love from a classic french onion soup, with very basic mac & cheese recipe. My French Onion Mac & Cheese features red wine caramelized onions, beef broth, and, the best part of french onion soup, that cheesy gruyere and crouton topping, all served in individual soup bowls to give the full effect. I was so incredibly happy with how my French Onion Mac & Cheese turned out and cannot wait to share my recipe with you on February 3rd, when the Creamy Mac & Cheese Challenge goes live on the Dairy Farmers of Canada site!

Magical Oatmeal Raisin Cookies - ...enough said.

On My Mind:
Rethinking the humble carrot.


You have to check out one of my favoruite pinners Beth Kirby from Local Milk. The girl has an awesome eye for all things beautiful, and I repeatedly find myself pinning her gorgeous photos inspiring great style and delicious food!

Oh how children's toys have changed. This nostalgic look at old toys from the 80's is a great reminder that the "gendering" of children's toys is absolutely bananas! 

The only thing helping me survive this horrible, horrible polar vortex is my Little Hotties hand and foot warmers. Do yourself a favour and scoop up as many of these babies as you can get your hands on! 

Chris and I booked our plane tickets to London, England last night! Europe, here I come!!

This week in my Nutrition & Lifestyle class we learned about the incredible benefits of adding coconut oil to your diet, and it's ability to speed up your metabolism. Is coconut oil part of your diet?

Follow me on Twitter!
Like me on Facebook!
Follow me on Instagram!
Follow me on Pinterest!

Listening To:
Phosphorescent - Tomorrow Is A Long Time (Bob Dylan Cover)

Wednesday, January 22, 2014

Leftover Lovin': Arancini AKA "What To Do With Leftover Risotto"

Risotto has always been one of my favourite Italian dishes thanks to it's creamy texture with that little bit of bite from the al dente arborio rice, and the subtle savoury flavours that are worked into the rice dish. Risotto has this ability to send me up into foodie heaven, keeping me glued to my chair, never wanting to leave, happily eating bite after bite of risotto until the sun comes up. Except we know that can never happen right? You can never really eat risotto all night long, unless of course you are lucky enough to have someone cooking it for you and fitting the bill all night. The reason why risotto really can't be eaten all night long is yes, because it's very starchy and would fill you up mighty quickly, but also because those starches just get starchier and more gluey in texture as the risotto rests. Think of risotto as the Cinderella character of the meal. Risotto joins the dinner all dressed up, looking like a star, with everyone eying it for just a taste. And just when you start to get to know risotto, indulging in its complex flavours, and getting seduced by its comfort inducing creaminess, it begins to change. That beauty that you saw when the risotto arrived at your table begins to diminish, as does that creamy texture that drew you in to begin with, and before you know it, it's gone! Ok, so maybe that metaphor is a bit of a stretch, but you know what I'm getting at, right? Perhaps it's the immediacy in which risotto must be eaten that adds to the allure of the dish, as does the sheer labour involved in making it.

In Chef Skills class at George Brown Culinary College this year we learned how to make risotto in our Rice & Legumes class. Where every other dish that we prepared that night was to be handed in at 9pm, our risotto had a much earlier "service time". Because of that Cinderella syndrome that risotto seems to have, Chef wanted us to call us over as soon as our risotto left the heat and hit the serving dish, so that he could taste it at its best and test it appropriately. As proud as I was to hand in my near-perfect risotto (that's right!! It was fantastic!), it meant that all that hard work standing over the hot stove, never allowing the risotto to leave my sight, constantly stirring so that the starches didn't fall to the bottom of the pan and burn, and adding ladles of hot stock every few minutes would be for next to nothing. All that hard work for only a brief taste from myself and my teacher. By the time class was finished and I trudged to my boyfriends apartment, hoping for his approval of my near-perfect risotto, it has already turned into a pumpkin...I mean, it had already become gluey and tough. I refused to let all that hard work go to waste! 

The next morning I immediately began looking up methods for making Arancini. You might be wondering, what is Arancini? Arancini (pronounced "A-ran-TCHEE-nee") is one of the best ways to use up leftover risotto. The leftover risotto is combined with a mixture of beaten eggs, more cheese, and breadcrumbs, and rolled into little individual balls. These risotto balls are then stuffed with a surprise cheese filling, and fried until crisp and golden, and served, once again, immediately so that cheesy centre remains all ooey, gooey, and melted. So basically, Cinderella found her glass slipper and is the belle of the ball all over again! Thankfully, after all that labour making the risotto, Arancini is much more simple to prepare and can be made up in next to no time, and still give you those heaven-bound results. So the next time you fret over wasting leftover risotto, think about making a batch of crispy ad creamy Arancini to keep that risotto love going!

Tip: Don't want to fry all the Arancini in one go? Simply roll out all the balls and lay out in a container or, if you have the space, a baking tray in an individual layer and freeze. When frozen, place them in a freezer bag or container, and place back in the freezer until ready to fry up! So easy!

* If you don't have Italian-style, just add your own spices and seasonings to regular bread crumbs

Ingredients:
vegetable oil, for deep frying
2 cups leftover risotto
2 eggs, beaten
1/2 cup Parmesan cheese, grated
1 1/2 cups Italian-style bread crumbs*, separated 
2 ounces Mozzarella cheese, cut into 1/2 inch cubes
salt, to season
marinara sauce, for serving (optional)

Directions:
  1. In a medium bowl, combine the leftover risotto with the beaten eggs, parmesan cheese and 1/2 cup of the breadcrumbs. Place the remaining breadcrumbs in a small-medium bowl. 
  2. Begin forming the risotto mixture into balls, just under 2-inches in diameter. Insert a cube of mozzarella into the centre of each ball, and re-form into a ball to seal the cheese inside. Dip the balls into the remaining breadcrumbs to coat the exterior of each ball evenly. 
  3. In large, heavy-bottomed saucepan, add enough oil to reach 3-inches in depth. Turn the element to medium-heat and, using a kitchen thermometer to test, bring the oil to 350ºF. Lay out a baking sheet lined with paper towel next to your frying station.
  4. Working in batches, carefully add a few balls at a time to the oil (do not crowd the pan!) and fry until golden, crisp, and heated through, about 4-minutes. Turn the balls as needed to ensure even frying. Remove from oil and lay out on paper-towel lined baking sheet. Season immediately with a bit of salt.
  5. Serve balls immediately with marinara sauce to dip. 

Listening To:

Monday, January 6, 2014

The Beginnings Of A Pie A Shepherd Would Be Proud Of

And so it begins...as I mentioned in my previous post, this year Ginger Rose will be looking a little different as I begin to share my experiences in recipe development, taking you through all of the stages I experience in creating a recipe that I will eventually give the stamp "From Ginger Rose's Kitchen", meaning it has been tested, tweaked, and revised until I am satisfied with the tasty results enough to call it my own. 

My first adventure in recipe development for 2014 reflects the icy, arctic, colder-than-Mars weather Torontonians have been experiencing as of late. Shepherds pie, in my opinion, is one of those staple comfort foods that this freezing weather just begs for. In the past, the only Shepherds Pie that I have attempted has been my Leftover Lovin' Pulled Pork Shepherds Pie, which featured leftover spicy, juicy, and flavourful pulled pork as the base. With such flavourful meat (simmering it for hours upon hours in a spicy sauce certainly helps) it's easy to create a spectacular dish, so starting from the bottom with plain old ground beef or what is traditionally used, lamb, can be a bit of a challenge. After much research, I put together a basic recipe for Shepherds Pie that I think is a great start to get me to that final, delicious, savoury, pie that would make any shepherd proud! Although I would have loved to have used lamb as the base for my shepherds pie, I began my experimentation with lean ground beef, a more cost friendly option as myself, and I know many of my readers, are on a budget. Due to convenience, I also used yukon gold potatoes for my mashed potato topping, as opposed to the preferred Russet baking potato, simply because that is what I had on hand. Using yellow potatoes won't make a huge difference in your final product, but it will slightly affect the texture, as baking potatoes are higher in starch and sugar than the yellow variety, which is waxy, with less starch, and less sugar. The below Shepherds Pie is a lovely and simple Shepherds Pie for first timers. Give the recipe a try and share your notes with me! What did you like or not like about the recipe? What would you add or change? I want to know! I hope you find this recipe as comforting as I did! Stay warm out there kiddies! 

* Cooking until softened is also known as "sweating". Sweating means to cook something until softened,  but without adding any colour. This is often done at medium to medium-low heat or for a very short time at medium-high heat.
** Mashed potatoes may be made in advance. Leftover mashed potatoes work great!

Ingredients:
4 potatoes (preferably Russet baking potatoes), peeled and cut into medium chunks
1 tbsp vegetable oil
1 medium onion, small dice
2 medium carrots, small dice
2 garlic cloves, minced
1 cup milk
1 tbsp butter
1 cup cheddar cheese, grated
salt & pepper to taste (use white pepper for mashed potatoes)
1.5 Ib lean ground beef 
2 tbsp flour
5 tsp tomato paste 
1 cup beef broth
1 1/2 tsp Worcestershire  
1 tsp fresh thyme
1/2 cup frozen green peas
1 tsp Sriracha hot sauce
1/4 tsp cayenne pepper
paprika, to dust on mashed potatoes

Directions:
  1. Preheat oven to 450º.
  2. Place potatoes in a small pot and fill with enough water to cover 1-inch over the potatoes. Bring water to a boil, then drop heat and simmer until tender (about 20-minutes). 
  3. In a large heavy-bottomed sauté pan (large enough to fit ground beef) set to medium hear, heat 1 tbsp oil. Add the onions and cook until softened*. When the onion begins to soften, add the carrot and cook until slightly softened. In the last minute of cooking, add the garlic. 
  4. Add the beef to the vegetable mixture and break up with a spatula. Cook until all meat has browned and no red remains. 
  5. While meat is cooking, drain the potatoes. Return the potatoes to the pot and set to medium heat. Dry the potatoes for 1-2 minutes and remove from heat. Mash the potatoes and add the milk, butter, and cheddar cheese, stir to incorporate. Taste and season with salt and white pepper. Set aside.**
  6. When meat has browned, add flour to beef and stir to coat. Cook for 1-minute. While it is cooking, add the tomato paste.
  7. Add the beef broth and bring to a boil. Add Worcestershire and thyme and simmer until thickened and slightly reduced. 
  8. Add the peas, Sriracha, and cayenne. Taste and season as needed with salt and pepper, and additional hot sauce.
  9. Spread meat mixture evenly in a 10.5 x 12.5 glass baking dish. Top evenly with mashed potatoes making sure to create a seal around all of the edges so that the mixture does not bubble up to the surface during cooking. Sprinkle the top lightly with paprika. Bake for 25-minutes. Cook 3-4 minutes and serve hot. 
Notes for next time:
  • I would like to try using dried thyme, adding it into my vegetable mixture as it softens. I think this flavour may work better.
  • Add 1/2 cup fresh or frozen corn niblets for more flavour and texture.
  • Add more tomato paste.
  • Play with other flavour enhancers.
Listening To:

Rose's Roundup - The Extremely Belated Where-Did-The-Holidays-Go Roundup

Hey! Remember that time I wrote a weekly roundup that featured two or three weeks of posts...that I didn't post for about three-four weeks? It's amazing how time can fly during the holidays! So below is my very extremely belated roundup that has resulted in my changing my "Weekly Roundup" to a plain 'ol "Rose's Roundup" so I can feel like less of a failure each time I get my roundup up in a very untimely manner. 

I can't help but become introspective with the change of year each January, and this year has me thinking about priorities. This past year has been an extremely busy one for me, juggling three jobs plus my food blog, and evening courses at George Brown College for Chef Training, and I fear with so much on my plate (literally and figuratively) that some of the more important tasks are getting lost in the juggle. I'm hoping that my awareness of this will help me to edit my life a little bit and gain better perspective on my goals and the things I want out of my year. 

What's my main priority for 2014? I am determined to land myself a job working in recipe development. My blog has opened me up to so many wonderful opportunities and experiences like getting to attend hot events in the city; reviewing new products, books, and recipes; meeting and mingling with top dogs in the industry; and so much more! But what has been the most enjoyable for me has been the many different recipe development projects that I feel so lucky to be invited to work on, with companies from all over the country! I love the challenge of playing around with different ingredients, revising and editing until I have a finished product that I can't wait to send in, so very proud of the delicious results! 

I feel like I have been a bit neglectful of my blog because I don't often want to post a recipe until I feel confident that it is fantastic and ready for you to make in your own kitchen, which with my limited timing is not as often as I would like. Because of this you are going to begin to see a few changes in my blog. My blog is going to take a slightly different direction as I share my experiences developing recipes, acting as my own journal as I experiment with different recipes until it reaches that fantastic stage. All recipes will be experimental and open to revision until I give it my "From Ginger Rose's Kitchen" stamp of approval. I hope that this will open up a conversation with my readers as you play around with the different recipes that I post. I invite you to share your experiences in the kitchen, offering up tips and tricks that will help me to build on my recipes and grow as a chef. Thanks to all of you who have stuck with me and supported me all this time! Ginger Rose wouldn't be what it is today without you! Cheers to many new opportunities and experiences in 2014! 
CLOCKWISE FROM TOP LEFT
Burn-My-Face-Off Chili - On a cold Winter Saturday, after working a busy shift at the pub all day long, nothing could make me happier than a big bowl of spicy chili and my boyfriend to cuddle with. While I was running around the pub getting beer and wing dip all over myself, my boyfriend Chris took some time out of his leisurely Saturday to make my night a little spicier. After a bit of chili research Chris came across an award-winning recipe for a Texas-style chili that he felt fit the bill for the night. After anticipating that big bowl of chili all day, I was perhaps a little too generous with my serving...a decision I would regret later. Chris' chili turned out to be so incredibly flavourful and delicious but....it was the spiciest damn thing I have ever eaten in my life!!! By far!! This chili was INSANE! After a few bites resulting in a flushed face and a sweaty head, we ended up doing shots of milk after each bite to tame our tongues at least a little bit. Despite the large bowl of seemingly liquid hot lava that I was served, I couldn't help but finish the whole bowl! It was just too delicious, even with all the heat! To try out the chili for yourself, check out the recipe here!

Potato Latkes - Every year come those eight crazy nights of Chanukah all I find myself thinking about is potato latkes. Over the years I have improved my latkes immensely, yet I still feel the need to try and perfect them, and turn those fried little rounds into a legend! This year the step that set my latkes apart was dumping all of the grated potatoes into a clean kitchen towel and squeezing the hell out of them multiple times to remove as much water as possible. That seemed to work wonders, but silly me did more latke research after making my latkes and picked up a few other interesting tips that I wish I had tried. One of the tips was to squeeze out the potato liquid into another bowl so I can keep the white potato starch that sinks to the bottom to add back into the potatoes to help them adhere together. On that note, if you don't have much potato starch left over, just buy a box of potato starch and use that! Here's to achieving those legendary latkes next year!

Sauce Week At Chef School - In our final class at George Brown Chef School before our exam we learned how to make six different sauces, many of which make up the "Mother sauces" or "leading sauces" which means they are the base that can lead to creating many other sauces. On the menu was:
Béchamel
Velouté
Chicken Demi Glace
Tomato Sauce
Beurre Blanc
Red Pepper Coulis
Although sauces were originally invented as a way to cover up bad and/or old meat and other unsavory ingredients, sauces have now become a staple to many meals adding flavour, visual appeal, moisture, and more! Being such a saucy gal, this was one of the classes I was most looking forward to all semester! I have always loved eating a good sauce, yet I found when I would attempt to make various sauces in my own kitchen, they would often fall flat. Learning about the breakdown of the different mother sauces, and learning about the three different rouxs and when to use them helped me to understand what I was doing wrong in the past, and little tricks that I can use to fix a sauce gone wrong. My favourite trick to thicken a sauce after making a roux is to make a Beurre manié, which is a paste made out of equal parts butter and flour that you can whisk into pretty much any sauce. This trick saved my ass when it came time to mark my sauces as both my béchamel and velouté didn't seem to want to thicken to the right consistency despite my efforts at making a roux at the beginning. I am looking forward to playing around with the various sauce-making techniques I learned in class to apply to future recipes! 

Emma's Country Kitchen - It's not often that I treat myself to brunch, with my Sundays all tied up with work each week, and my Saturdays dedicated to homemade breakfasts, but recently Chris and I decided to leave the breakfast making to someone else and consulted a list of the best brunch spots in Toronto. Although the list of fifty that we went through had so many tempting options, the one that stood out for us was Emma's Country Kitchen. Although their homemade biscuits was the first thing that caught our attention, it was the homemade dolce de leche beignets that got us rushing to put our coats and boots on and head over to St. Clair and Dufferin to indulge in brunch heaven. We knew we were in for a wait before going, so the crowded entrance came as no surprise to us. After about a half hour wait we were seated at the counter by the window (despite the uncomfortable stools, I love me some people watching!) and were being poured freshly squeezed orange juice and were requesting an order of three beignets! We were devastated to hear that the beignets were all sold out for the day (which just means I must go back!), so we settled on one giant house-made apple fritter, a worthy replacement. With images of fluffy warm biscuits in our minds, both Chris and I ordered the eggs benedict on biscuits. So incredibly rich, Emma's Country Kitchen eggs benedict definitely makes my list as one of the best eggs bennies I have had! Great food plus super service means you will be seeing me again Emma! Hopefully soon!
CLOCKWISE FROM TOP LEFT
Shrimp 'n Grits - What do you do when you are pressed for time and have a fridge full of a whole lotta nothin'? You learn from your mistakes and make sure your fridge is stocked for next time! No I don't mean fresh foods, although that is the best option, sometimes a busy schedule means that just can't happen. This is why I always like to keep frozen shrimp in my freezer (as well as good meal additions like frozen dark leafy greens, green peas, and corn niblets) and stone-ground grits in my pantry (just like you would have dried pasta, polenta, rice, and other grains). Last week when I was pressed for time before class and in need of substance before rushing out, it took all of 20-minutes for me to whip up a delicious and satisfying meal. I turned to Bobby Flay's recipe for shrimp and grits, thankful that I had some leftover bacon and a bit of parsley kicking around in my fridge. This recipe was so simple, yet so tasty!

Final Exam At Chef School - Last week I had my final exam for Chef Skills 1 at George Brown college and I am very proud to say I DID IT! I PASSED! On the menu for our exam was
Purée of Cauliflower Soup with Roasted Cauliflower
Fettuccini
Mushroom Cream Sauce
Goats Cheese & Sundried Tomato Wrap
I was really happy that our final exam challenged us, as we had never made anything on the menu other than the fresh fettuccini before, but was still fairly simple so we were scrambling to get everything handed in on time for "service". Although I was a little skeptical as to how I was going to fare at first, I was so incredibly relieved to have our chef tell me that everything was near perfect! I was ecstatic! I am so unbelievably happy that I made the snap decision to sign up for chef school this past Fall. I have learned so much and have acquired so much more confidence than I could have ever hoped for. This has been such a rewarding experience for me. I'm really looking forward to seeing where the rest of the courses take me and sharing my chef school adventures with you! 

Beef Bourguignonne - After Chris had spoiled me the previous week with his delicious homemade chili, I felt it was my turn to treat him to a warm and comforting meal. With Chris as my lovely sous chef, together we made Williams Sonoma's recipe for Beef Bourguignonne. What made this recipe stand out for us was the addition of swiss chard and turnips, making this comforting meal a little more healthy. The beef bourguignonne turned out absolutely incredible!! Chris was going nuts over it repeating over and over again "this is so good Dani!" and "this is definitely the best thing you've made me!" while going up for multiple helpings. This is one recipe that will most certainly be going down in the favourites! I can see myself making this one pot wonder for years to come!

Metro Gingerbread House - Last week thanks to Metro, I was sent a special delivery of a little pre-built gingerbread house designed by design expert Kimberley Sheldon and made by For The Love Of Cake, along with decorating tips from Kimberley! It's always been my dream to make a little log cabin gingerbread house, so with Kimberley's suggestion of having a colour scheme in mind, I attacked the aisles of Metro with Chris and bought all the goodies needed to make a little log cabin gingerbread house! Although we thought we would be working on the gingerbread house into the wee hours of the night, we actually had it all decorated and beautiful pretty quickly! After a couple hours of decorating with the awesome Leafs game on in the background we had created my dream gingerbread log cabin! It was so adorable, I'm kind of obsessed with it and want to become miniature so I can live in it forever! If you haven't made a gingerbread house this year yet, just stop by your local Metro and make a dream gingerbread house of your own!

Follow me on Twitter!
Like me on Facebook!
Follow me on Instagram!
Follow me on Pinterest!

Listening To:
Timber Timbre - Magic Arrow