Showing posts with label Thanksgiving. Show all posts

Monday, September 10, 2018

Sausage & Apple Phyllo Bites

Pies, crumbles, muffins, cakes; It's easy to come up with plenty of delicious sweet dishes using apples, but with apples so abundant this time of year in Ontario, I was itching to move away from familiar sweet flavours and create a savoury dish using local apples. While it's still pretty early, I'm always looking for new dishes to add to my potluck repertoire to bring for my family's Thanksgiving. We always do a potluck format for our big family holiday dinners, so that everyone can contribute to the work and celebration. While a lot of family members have their favourites that they like to stick to each time, I tend to get bored easily and am always looking to switch things up with something new and exciting!

With savoury apples on the brain, I kept swimming around the idea of creating my own version of a sausage roll, but this time with apples as well! I love the combination of pork and apples together, and with sausage rolls as a popular Thanksgiving appetizer (it's such a delicious and comforting way to kick off a meal!) I knew I could create something special that I would be proud to serve to my family!
To make my own sausage rolls a little bit different, I first added sweet and sour Granny Smith apples to aid in rounding out the flavour of the sausage meat. I also added some fresh rosemary still kicking around in my garden, and chose to wrap my rolls in phyllo dough as opposed to the traditional puff pastry, to give them more of a crunchy exterior. I also spread two different types of mustard (one dijon and one with lots of texture) right on the interior of the phyllo to allow the flavours to blend during baking. I love mustard, but I find that sometimes sausage rolls can be a bit bland, and when dipped in mustard, the flavour is improved, but can overpower the roll all together. Adding the mustard right into the roll avoids this, and gives a much more rich and well-balanced flavour.

I was so happy with how these sausage rolls turned out, and cannot wait for my family to try them! These will be so easy to transport to my aunts house that we are hosting Thanksgiving at, as well as reheat without losing their texture or flavour.
Ingredients:
1 Tbsp olive oil
1 medium onion, small dice
1 large Granny Smith apple, small dice
1 lb. fresh Italian sausages, casings removed
1 tsp fresh rosemary, minced
Metro Irresistibles Frozen Phyllo Pastry, thawed
about 1/2 cup Kozliks Triple Crunch Mustard
about 1/2 cup Metro Irresistibles Traditional Prepared Dijon Mustard
about 1/2 cup unsalted butter, melted
Maldon Salt, for garnish (optional)
salt and pepper to season

Directions:

  1. Heat a large skillet to medium heat. Heat olive oil and add onion, apple, and a pinch of salt and pepper and cook, stirring occasionally, until softened. 
  2. Add sausage meat and break up with a spatula, and cook until browned. Add rosemary and stir to combine. Taste and season as needed with additional salt and pepper. Set aside to cool. Filling may be made in advance.
  3. Preheat oven to 375ºF. 
  4. Stir together both mustards in a medium bowl. Lay out your phyllo pastry and cut into four even strips widthwise. Take one stack of phyllo strips and place them on a work surface. Cover both stacks of phyllo with damp cloths. 
  5. Working one at a time, lightly brush one sheet of pastry with butter and layer another sheet on top. Brush lightly with butter once again, and lay a third sheet of pastry on top. Leaving a 1/2-inch border from the end of the strip, spread about 1 tsp of the mustard mixture. Top with about 1 1/2 - 2 Tbsp sausage and apple mixture. Roll in the half-inch border on the end and both sides, like you're wrapping a present, and carefully roll up. Place on a greased baking sheet, and continue this process with the remaining pastry and filling. Brush the tops of the rolls with melted butter and score with a knife. Sprinkle a little Maldon Salt on top of each one for garnish (optional). 
  6. Bake for 20-25 minutes, or until golden. Serve immediately or refrigerate. To reheat, place in a 200ºF oven for about 10-20 minutes, covering with aluminum foil if they start to get too dark. 
This post was created in partnership with Metro Ontario. 

Listening To:
Darling - Real Estate

Tuesday, January 24, 2017

Turkey & Dumplings Recipe

Last year I was introduced to what may possibly be the most comforting dish on the planet: Turkey & Dumplings. As you may know from my previous post on Turkey & Dumplings, I first had this Southern-inspired dish on my most recent birthday at the Toronto restaurant Omaw, and was totally taken by the fantastic contrast of flavours and textures represented in the dish. 

Chris and I promptly tried to recreate the dish in our own kitchen, and it turned out so ridiculously incredible! Of course, because we were playing around so much with the dish on our first go at making it, we weren't able to record a clear breakdown of the recipe. Alas, with such an amazing response from everyone on the photo that I posted of our Turkey & Dumplings copycat recipe, we had to give it another go, but this time carefully recording every step. 
So with that, I bring you our version of Turkey & Dumplings, a must-make recipe for any comfort-food lover! Last time we made this dish, we were lucky to have leftover Thanksgiving turkey on hand, so this time we decided to roast off some fresh turkey thighs, so that we could make this dish all year round. Thank you to The New York Times for providing a killer method for making roasted turkey pieces that taste like they came off of a whole-roasted bird! You can find our slightly modified recipe for roasted turkey thighs below as well. 

Tip: Save the turkey skin after roasting and fry into crispy chips to use as a garnish! 

Ingredients:
8 cups chicken stock (preferably homemade)
1 medium onion, small dice
2 stalks celery, small dice
2 medium carrots, small dice
3 garlic cloves, minced
1/2 cup fresh or frozen corn niblets
1 Tbsp. fresh thyme, leaves picked
3 Tbsp butter
3 Tbsp flour
3/4 cup roasted or smoked ham, diced
2 bay leaves
1/4 tsp cayenne pepper
1 medium/large parmesan rind
1/4 cup grated parmesan cheese
2 Tbsp. sour cream
about 2 cups shredded roasted turkey meat (dark meat) *see recipe below for roasting turkey thighs
kosher salt and pepper to season
Beurre Manie 
1 Tbsp. flour
1 Tbsp. cold butter
Dumplings (Tyler Florence Recipe)
2 cups flour
1/2 Tbsp baking powder 
1/2 tsp kosher salt
2 eggs
3/4 buttermilk

Directions:
  1. Set a large dutch oven on the stove set to medium heat.
  2. In a separate medium pot, heat stock to medium heat. 
  3. Add onion to dutch oven and heat. Add carrots and celery and sweat. Season with salt and pepper. Add corn, garlic, and thyme and cook until fragrant (about 30-seconds to 1-minute).
  4. Add 3 Tbsp. butter and melt. Add flour and stir to make a roux. Cook for about 1-minute.
  5. Slowly begin adding in the stock, one ladle at a time, while stirring to incorporate. 
  6. Add in ham, bay leaves, cayenne, and parmesan rind. Season with salt and pepper. Bring to a boil, reduce to a low, and simmer for 30-minutes. 
  7. Remove bay leaves. Add in grated parmesan cheese and sour cream. Taste and season as needed with salt and pepper. If mouthfeel is off and the soup is too thin, prepare a Beurre Manie. 
  8. To make a Beurre Manie: combine 1 Tbsp. flour with 1 Tbsp. cold butter and smoosh together with the back of a spoon. If you want, get right in there and smoosh it together with your fingers to form a paste. Drop the paste bit by bit into your soup and stir in. 
  9. Make Dumplings. In a medium bowl, whisk together dry ingredients. In a small bowl, lightly beat together eggs with buttermilk. Fold wet ingredients into dry ingredients. If it feels too tough, add in another few tablespoons of milk. Drop spoonfuls of batter directly into the soup. Simmer for 10-15-minutes, flipping part way through. 
  10. Stir in turkey and any drippings (you may also add in the garlic and onion that was roasted with the turkey thighs). Cook 5 minutes. Serve immediately. 
Roasted Turkey Thighs
(Slightly adapted from The New York Times)
Ingredients:
1/4 cup butter, softened
1 Tbsp. fresh thyme leaves
2 turkey thighs, washed & dried
salt and pepper to season
rosemary salt (optional)
1 Tbsp. olive oil
2 celery stalks, roughly chopped
1 medium carrot, roughly chopped
1 medium onion, quartered
4 garlic cloves, whole 
4 thyme sprigs

Directions:
  1. Preheat oven to 450ºF. 
  2. Stir together butter and thyme leaves and rub all over turkey pieces, making sure to get some underneath the turkey skin.
  3. Season generously with salt and pepper, and rosemary salt (if you have any!). 
  4. Toss celery, carrot, onion, and garlic with olive oil and season with salt and pepper. 
  5. Place thighs in a medium roasting dish or baking pan and tuck the celery, carrot, onion, garlic, and thyme sprigs around the meat. 
  6. Roast for 30-minutes. Reduce heat to 325ºF and roast for an additional 15-20-minutes, or until the internal temperature reaches 165ºF, while basting occasionally with accumulated juices. 
  7. Remove from oven and tent with tin foil for 30-minutes. Separate the meat from the bones and shred with 2 forks. Set aside in fridge until ready to use. 
Listening To: 

Wednesday, November 2, 2016

Thanksgiving Leftover Lovin': Turkey & Dumplings

Leftovers, you love 'em, or you hate 'em. While I most definitely used to hate leftovers, I've found over the years, and after living on my own, eating leftovers is an essential part of reducing food waste and staying on budget. More than that, I've learned that I can actually have the power to become a leftover lover if the leftovers are transformed into something that doesn't resemble the original dish. It was this discovery that inspired my blog series Leftover Lovin', which has been terribly neglected over the past few years, but must be brought back thanks to my most recent outrageously delicious leftover transformation, inspired by my Thanksgiving dinner and a delicious birthday dinner out!

While going wild and partying has never really been my thing for celebrating my birthday, what I do look forward to the most, come my annual day of birth on September 30th, is going out for delicious meals with my loved ones. Lucky for me, this included three fantastic meals spread across my birthday weekend. 

The first dinner out was on the night of my birthday with my boyfriend Chris, where we checked out Omaw, Chef Matt Blondin's latest restaurant, doing Carolina classics with a gourmet twist. Having been to and enjoyed Blondin's previous restaurant Acadia, we were eager to see how his most recent menu would stack up. Though I have to say, the service definitely left something to be desired, the menu was thankfully lovely. Though the Shrimp & Grits (an Acadia favourite that Blondin reintroduced for Omaw) was spot on, the standout dish of the night had to be Blondin's aromatic bowl of Turkey & Dumplings with onion likkar and black truffle - SWOON! With a rich and complex turkey broth, big chunks of tender and moist roast turkey, gnocchi-like pillows of handmade dumplings, black truffle oil, and fried onion matchsticks for crunch (this would be the onion likkar), this dish blew both Chris and I away! So comforting, so well-balanced, and so not enough in one bowl to satisfy us both. It was so delicious, we should have each ordered a bowl to ourselves! 

With Canadian Thanksgiving only one week away from my birthday, all I could think about the week following my birthday was how I could recreate that incredible Turkey & Dumpling dish with my Thanksgiving leftovers. While, no, I don't have a clear recipe for you this time, with so much experimenting during the process to get just the right flavour and mouthfeel, I still wanted to share my photos of the final dish, and a little bit about my process. The response to the photo of my bowl of homemade Turkey & Dumplings that I posted on my various social media accounts was so overwhelmingly positive, that I think it's only fair to share as much as I can with you, and hopefully I can refine it soon enough so you can have the real thing!
The great thing about a recipe like this is that it is so forgiving, allowing you to forget about measuring your ingredients (it's all about eye-balling it here!), and play around with what you happen to have on hand. For this dish, I started out with a basic mirepoix of onion, carrot, and celery (diced small), and to that added in some minced garlic, fresh Ontario corn niblets leftover from Thanksgiving, dried bay leaves, and fresh thyme. I then stirred in a roux, and slowly poured in homemade turkey stock (thank you to Chris' mom Tracey for the tasty stock!) and some leftover ham from Thanksgiving (diced small). At this point, I brought the soup to a boil and allowed it to simmer for about 20-30 minutes to let the flavours develop and the broth to thicken.

After tasting I felt the soup still needed more flavour and more of a creamy and rich mouthfeel. Now this is where things get a little hazy, as I began to scour my kitchen for anything I could possibly find to turn my soup into something incredible. I then added a pinch of cayenne pepper, a few pinches of ancho chilli powder, a large Parmesan rind (I always save them in the freezer for soups and sauces!), grated parmesan cheese, a few tablespoons of sour cream, and lots of salt and pepper to season. To aid with the mouthfeel issue, I dropped in a beurre manié, which is like a roux, but kneaded, and added after you have added in liquid. So basically, if you messed up your roux at the start of your process and your soup or sauce isn't thickening, a beurre manié can save the day! Check out Saveur's guide on how to prepare a beurre manié to learn about your new favourite hero in the kitchen.

Once my soup was at the right consistency and flavour, I quickly whipped together Tyler Florence's recipe for dumplings, and spooned them in. Once my dumplings were lovely, plump, and cooked through, I stirred in my leftover shredded cooked turkey from Thanksgiving (dark meat will taste best here!), which was added at this point so it wouldn't dry out. After a short simmer to allow the turkey to reheat my turkey and dumplings were ready to devour! And oh did we ever devour it! Chris and I went nuts over this dish. It was, to put it simply, outrageously delicious. A true winner and a recipe I look forward to refining and sharing with you soon! Is it safe to admit that I'm now counting down the days to Christmas dinner leftovers? 

Listening To:
Happier Podcast

Thursday, October 10, 2013

Mott's Clamato Thanksgiving Day Caesar

Mott's Clamato has your Thanksgiving cocktail covered with their festive take on a Thanksgiving Bloody Caesar. The classic Caesar cocktail is given a Thanksgiving twist thanks to the addition of a thanksgiving favourite, cranberries. There's nothing like that combo of sweet and savory to get my mouth watering! Make Canada's Cocktail Thanksgiving Day Caesar apart of your family's holiday celebration! 

Glass: Highball
Rim: Fresh cracked salt & pepper
Garnish: Turkey, cheese, & cranberries on a skewer or rosemary sprig

Ingredients:
1 oz. gin
2 dashes hot sauce
3 dashes Worcestershire Sauce
1 oz. cranberry juice
3 oz. Mott's Clamato Original

Directions:
  1. Rim the glass.
  2. Fill the glass with ice.
  3. Add ingredients in order listed above.
  4. Stir.
  5. Garnish.

Listening To:

Saturday, March 3, 2012

Leftover Lovin': Turkey Pot Pie

I am the queen of procrastination, as I'm sure you all know by now. I can turn any simple task into a trek up Mount Everest, making myself believe that something is much more difficult and grueling than it truly is. The mind is a funny thing, tricking me into believing that writing a blog post on how I used up my Christmas leftovers is a far more intimidating task than cleaning my bathroom, or in some cases even cutting my own hair.

"Nope, I can't write that blog post right now, I have to clean the bathroom! And what better time to see if I can give myself a haircut! And hey, while we're at it, why not walk all the way to the drugstore and buy an at home waxing kit!"

Some would call my justification and excuses for procrastination absolute insanity! The problem with procrastinating is that the longer you leave a task, the worse it gets, giving you more and more reasons to put it off even further. Which brings me to this very entry, my recipe for Turkey Pot Pie, or how I used up my Christmas leftovers...yup, you heard me! Christmas leftovers! UGH! What the heck is wrong with me?! In case you've been hibernating these past few months, we are now three days into March! March! Christmas has been over for more than two months! What the heck is wrong with me?! As ashamed as I am that I left a Christmas leftover recipe until March, I can see the bright side of this sad little situation I've gotten myself into. I'm hoping that this entry will become a reminder for me about why I should kick my procrastination habit in the bud, and in the future just suck it up and DO THE WORK!

As much as this recipe seems irrelevant at this point in time, it is absolutely a recipe that you can make all year round. No, most of us don't exactly have turkey leftovers kicking around our fridge very often, but luckily you can easily substitute cooked chicken into this recipe, making it the perfect weeknight fix all year! What I love about this recipe is that you are totally transforming your leftovers so that you don't feel like you've been eating the same thing all week long (really, how many turkey sandwiches can one have in a week?), while still achieving that same comfort factor that you originally had with a roasted turkey (or chicken) dinner. Because I was short on time, I wanted to simplify the pot pie even further. I thought back on some of the best pot pies I've had in my life and the one that stood out the most was made by my good friend Rita, who made Ina Garten's Individual Chicken Pot Pies at a dinner party once. The individual pot pies did not have a crust inside, only a thick, flaky crust on top. I initially thought that I would miss the crust on the bottom, but the filling was so delicious, and there was so much pastry on top that I didn't notice the missing pastry inside! Although I wasn't making individual pot pies as Rita had, I still only wanted to put the pastry on the top to save myself some time on a busy weeknight. I was a little concerned that the final dish wouldn't be successful because I was also not making my pastry from scratch, as Rita had also done (she's putting me to shame right now!). Thankfully the puff pastry topping turned out great! I still achieved that delicious flaky crust that I was craving, and had enough so that I could get a little bit of that yummy pastry in each bite, a great contrast in texture and flavour with the hot and bubbling savory filling. Turkey is a holiday menu staple for my family, and I have a feeling this Turkey Pot Pie will make its way onto our table as our holiday leftover staple after each and every one of those holidays!

Ingredients:
2 tbsp butter
1 onion, chopped
2 cups carrots, chopped
2 stalks celery, chopped
1 tsp dried oregano
1 bay leaf
2 cups chicken stock
1/3 cup butter
1/3 cup flour
1/3 cup cream, heat to hot
1 1/2 cups cooked turkey, shredded (may substitute with chicken)
1 1/2 cups frozen peas
2 tsp salt
1/2 tsp pepper
1 sheet frozen puff pastry, thawed

Directions:
1. Preheat oven to 400º. Grease an 8-inch casserole dish with butter, set aside.

2. In a large skillet, melt the 2 tbsp butter over medium heat. Add the onion, carrots, celery, oregano and cook, stirring occasionally, until vegetables are soft. Add the chicken stock and bay leaf and continue cooking over medium-low heat, until stock is hot.

3. In a medium saucepan, melt the 1/3 cup butter over medium-low heat. Add the flour and continue cooking, stirring constantly, for 2 minutes. Add the hot cream and continue cooking f while stirring until mixture thickens. Slowly begin adding in the chicken stock mixture a little at a time, while stirring. Remove the bay leaf. Add the shredded turkey, frozen peas, salt, and pepper.

4. Pour the mixture into the greased casserole dish. Roll out the puff pastry to cover the top of the casserole dish. Place puff pastry over dish trimming excess pastry. Bake for about 30 minutes, or until puff pastry is puffed up and golden. Remove from oven and let stand for 5 minutes. Serve in shallow bowls.

Listening To:

Monday, January 2, 2012

Wild Mushroom Baked Brie

The holidays: a time for love, giving, family...and...repetition. I'm not quite sure how many years it's been going on for, but for as long as I can remember my family has been serving up the exact same meal at Easter, Thanksgiving, and Christmas. For years I loved that tradition, knowing that I only had a few months to wait before I could enjoy that same delicious meal again, but as more and more years have passed, and at a much more alarming pace, both myself and some other family members have grown a little tired with our staple holiday meal. The first time my sister and I suggested switching up our holiday meal, we were returned with either a grimace or a confused deer-in-headlights expression. No one was the slightest bit interested in shaking up the familiar meal. I understood where everyone was coming from, seeing as the meal...actually, make that feast is so damn delicious, but at the same time, I felt it would be more special if we had it less frequently. Another year of the same meal passed and we began to see family members taking our side one at a time. Slowly people began switching up their signature dish (our meal is always a pot luck so that everyone is contributing), either making a variation on their old standby, or sticking to their same theme of either vegetable, starch, protein, salad, dessert etc. but turn it into a completely new dish. By slowly introducing new flavours and menu items, both the family members that were itching for something new and the ones who loved the old meal would walk away with a full belly and a smiling face.

For about three years now, I have been on appetizer duty for our Christmas dinner, a role that I absolutely love to take on! Despite the incredible wide range of delicious appetizer options there are, especially for the holidays, I always crave a good baked brie come Christmas time. Baked brie can be as easy as wrapping a wheel of brie in tin foil and popping it in the oven, but I enjoy playing with different flavours, both savory and sweet, when it comes to my homemade baked brie. In the past I've made everything from caramelized onion brie, cranberry brie, pecan brie, the list goes on, so that no matter if I am making baked brie again, I can still surprise people by turning it into something new and interesting. This year I wanted to use an ingredient I have never cooked with before, dried mushrooms. When it comes to wild mushrooms, many people choose dried as opposed to fresh for the wonderful convenience and concentrated mushroom flavour, so I was curious to finally give them a try myself and see how the flavour measured up. Using a bag of mixed wild mushrooms including shiitake, oyster, and porcini, as well as some caramelized onions, fresh thyme, and balsamic vinegar, I made an insanely quick and easy brie topper and had my yummy appetizer ready to go into the oven before I knew it. Because there is so much cooking and baking being done last minute on Christmas, I made my brie and wild mushroom topper ahead of time so that 20 minutes before our guests arrived all I had to do was simply pop my little brie baker in the oven! Bubbling, oozing, and perfectly melted through, the creamy brie arrived at the table hugging the mushroom mixture layered on top, a dangerously tempting sight! There's no question that I have a tendency to toot my own horn when I'm really happy with how a dish turned out, but there was simply no need to when I served my Wild Mushroom Baked Brie, because the brie baker, which was empty within a matter of minutes, spoke for itself. Easy, convenient, attractive, and incredibly delicious, my Wild Mushroom Brie may have to make another appearance at our next Christmas dinner...or is Easter too soon?

Tip: Make your wild mushroom mixture brie topper ahead of time to save time before your guests arrive. Simply top your brie and bake 20 minutes before guests arrive.

Ingredients:
1/2 medium-large onion, sliced
2 tbsp butter
1 small package dried mixed wild mushrooms (equalling about 1/2 cup dried)
4 tbsp balsamic vinegar
2 tsp fresh thyme leaves
salt and pepper
1 wheel of brie, about 5 inches in diameter

Directions:
1. Rehydrate the dried mushrooms following the package instructions, or place dried mushrooms in a bowl and add just enough boiling water to cover the mushrooms, let soak for about 20 minutes or until mushrooms have softened.

2. In the meantime, heat butter in a medium skillet at medium heat. When butter is hot, add the onions and stir. Place a lid over the onions in the skillet to allow them to steam, stir occasionally. Continue to cook onions in the lid, stirring occasionally, until they are softened and beginning to colour.

3. Strain out the soaked dried mushrooms (you may reserve the soaking liquid for a soup, stew, or sauce!), and squeeze them to remove any remaining water. Roughly chop the mushrooms and stir them into the softened onions on the stove. Cook for about 3 minutes.

4. Turn up heat to medium-high and add the balsamic vinegar, stirring to combine. Continue cooking until mushrooms are almost dry. Turn off the heat and stir in thyme. Season with salt and pepper.

5. Using a serrated knife, cut off the top rind of the brie wheel and place inside a brie baker (or on a large piece of tin foil). Mound the wild mushroom mixture on top of the brie and close the lid of the baker (if using tin foil, wrap the foil around the brie and mushrooms securely). Bake in a 350º oven for about 20 minutes. Serve immediately with fresh baguette and crackers.

Listening To:
TV on the Radio - Ambulance

Powered by mp3skull.com

Saturday, October 8, 2011

Happy Thanksgiving

Happy Thanksgiving! This year I feel thankful for so much, way too much to list in fact! But I would like to take the opportunity to thank all my readers for sticking by me, expressing your interest in my work, all your incredible words of encouragement, and sharing my blog with your own friends and family! Without you, I don't know where I'd be! So a great big thank you to you! You all deserve multiple helpings of pecan pie this weekend!

Still working out your Thanksgiving menu? Here are a few Thanksgiving recipes of my own that would make a great addition to your Thanksgiving table!


Listening To:
The Beatles - Rain

Powered by mp3skull.com

Thursday, December 30, 2010

Cranberry Lemon Squares

Another holiday season come and gone. Who can believe that tomorrow is the last day of 2010? I certainly cannot! This year has flown by at a frightening pace, leaving all of my many crazy nights, hazy mornings, thrilling adventures, laughter, tears, mistakes, inside jokes, unexpected turns of events, and so on in a blur in my mind. It amazes me how much my life has changed over the past year and, more significantly, how I have changed as a result of it. Come to think of it, it wasn't so much me changing as a result of life changes, but my life changing as a result of my own personal growth. This year I learned that life can throw you some pretty big curve balls that can throw your mind out of whack for whatever reason. Just when you think you have it all figured out, something new and unknown, or even ghosts from your past that you thought you had shaken, are sure to enter your life again. But hey, you live and you learn, and some of those scary curve balls can turn into a home run. It's all about rolling with the punches, embracing all of those mistakes, and learning from them in the future.

A few months ago a sniffly cold and lack of focus left me making a big mistake when making Cranberry Coconut Lemon Squares. I accidentally made the squares in a pan much smaller than the recipe had called for. At first I was really mad at myself for being so careless, thinking that I had wasted all of those ingredients and my time. I kept telling myself how stupid I was, and I thought it was just so typical for me to do something so silly. Low and behold the squares turned out incredible! Because I baked them in a small pan, they were extra ooey gooey and each bite gave you an almost overwhelming burst of extra tangy lemon flavour. Who would have thought that my mistake would turn into such a hit. Despite how delicious my Ooey Gooey Cranberry Coconut Lemon Squares were, I couldn't help but want to try my hand at them again, but this time with a clear mind, remembering my past mistake. I decided to try out a new recipe this time to switch things up a bit, so I used a recipe for Cranberry Lemon Squares with coconut from Canadian Living, changing a few things here and there to suit my taste. I secretly thought that they really would taste better making the squares in a larger, correct pan (I apologize for my past dishonesty), but in the end they were both just as tasty. I couldn't even pick which ones I preferred. Despite how much control I had over the recipe this time and how careful I was, it turns out that mistakes can end with just as positive of a result. So let go, embrace your mistakes, and look at how much more you have gained in the end...even if that may be weight from eating so many of your delicious mistakes. Cheers to more mind blowing mistakes in 2011!

Tip: To add just a touch of extra sweetness, dust the baked squares with icing sugar.

Ingredients:
Crust:
2 cups flour
1/2 cup granulated sugar
1/4 tsp salt
3/4 cup butter, cubed and softened
Filling:
2 tbsp flour
1 tsp baking powder
1/4 tsp salt
3 eggs
1 3/4 cups sugar
1/3 cup lemon juice
zest from half of a lemon
2 cups fresh or frozen cranberries, cut in half
1 cup shredded unsweetened coconut

Directions:
1. In the bowl of an electric mixer, mix together the dry ingredients for the crust: flour, sugar, and salt. Add in the butter and mix until butter is well incorporated, crumbly, and holds together when pinched.

2. Evenly, pat mixture into the bottom of a greased 13 x 9-inch cake pan. Bake in a 350º oven for 20 min, or until golden.

3. In a small bowl, mix together the dry ingredients for the filling: flour, baking powder, and salt, set aside.

4. In the bowl of an electric mixer, whisk together eggs, sugar, lemon juice, and lemon zest. Mix in the flour mixture. Stir in cranberries and coconut.

5. Reduce heat to 325º, and bake until filling is firm in the centre, 45-50 minutes. Let cool, then cut into squares.

Listening To:
La Roux - Quicksand (Alex Metric Remix)

Powered by mp3skull.com

Sunday, November 21, 2010

Baked Sweet Potato Mash

In my house, were really good about always serving at least one vegetable for dinner, but I find that we often put a lot of effort into the entree of our meal and don't really experiment much with our sides, particularly our vegetables. One of my favourite foods in the Fall is sweet potatoes, so it's not surprising that sweet potatoes can be found on my dinner plate at least 3 or 4 times a week. So one night for dinner this week, I decided to shake up our usual roasted or baked sweet potatoes by making a creamy and comforting sweet potato mash.

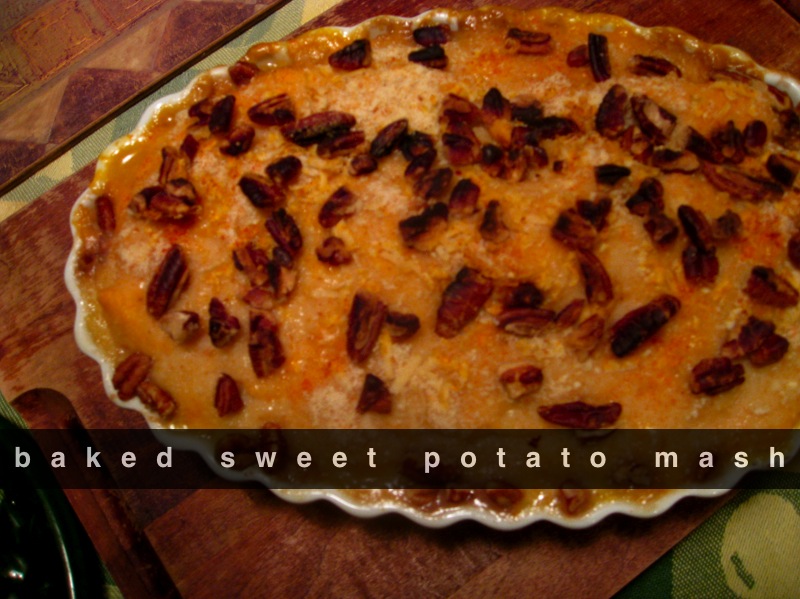
What was intended to be just a simple sweet potato mash turned into something much more interesting when our entree was a little behind schedule. The new rib recipe we tried seemed to be taking longer than we thought, so I had to stall my recipe so that I could still serve my mash hot and fresh. I decided to transfer the mash into a baking dish and top with some ingredients I happened to have on hand to add extra hits of flavour and texture. My Baked Sweet Potato Mash turned into out to be such a tasty dish! The sweetness of the buttery brown sugar sweet potatoes was cut by the saltiness of the parmesan cheese, with a little bit of crunch from the breadcrumbs and pecans, and a tiny hint of heat from paprika. Not only was this delicious as a side, the leftovers made for a perfect lunch to bring to work the next day!

Note: As you can see from the above picture, my pecans got a little burnt and my breadcrumbs are not very golden-brown. I made the mistake of pre-toasting my pecans, which had them browning up pretty fast with that second bake as the sweet potato topper. I had to cover the mash with tinfoil so that the nuts wouldn't burn anymore, which didn't allow for the breadcrumbs to crisp.
Note: This recipe can easily be made gluten free, just eliminate the breadcrumbs.

Ingredients:
4 sweet potatoes, peeled and cubed
1/2 cup half-and-half cream
3 tbsp butter
2 tbsp brown sugar
1/4 cup plain breadcrumbs
1 tbsp melted butter
about 1 tsp paprika
1/4 cup pecans
grated parmesan cheese to taste
salt and pepper to taste

Directions:
1. Put cubed sweet potatoes in a large pot of salted water. Bring to a boil on high heat, then reduce heat to medium-low, and partially cover pot with lid. Let cook on a gentle boil for 20-25 min. or until sweet potatoes are fork tender.

2. Drain water and place sweet potatoes back in pot. In a small saucepan, heat the cream with the butter and brown sugar. Add to potatoes and mash using a potato masher or add ingredients to a stand mixer and mix using the paddle attachment. Season mixture to taste with salt and pepper.

3. Pour mixture into a medium-sized greased baking dish. Place breadcrumbs in a small bowl and drizzle melted butter overtop. Combine using fingertips and crumble evenly over sweet potatoes.

4. Top breadcrumbs evenly with paprika, parmesan cheese, and pecans. Bake at 350º or until topping is golden brown. Serve hot or warm.

Listening To:
Paolo Nutini - Candy

Powered by mp3skull.com
(for my Robo in Australia!)

Saturday, November 13, 2010

Butternut Squash and Cranberry Quinoa Salad

If anyone saw my twitter post stating that the ultimate hangover breakfast is challah french toast topped with melted cheddar cheese, smothered in real maple syrup, and served with a side of crispy bacon (oops) may be thinking "hey, isn't this chick supposed to be eating healthy?" and the answer would be yes...yes I am...Sure I may have strayed a little this week, but let's talk about how good I was last week! Last week, after just having begun my newfound healthy kick I decided to try out a new ingredient. In my previous entry on my Bacon Cheddar Broccoli Salad I mentioned that I have been taking advice from @joyoushealth. One of the ingredients that I kept seeing popping up on Joy's twitter was quinoa and the many benefits of this super grain. After doing a quick search of some quinoa recipes, it wasn't hard for me to see that quinoa is not only amazing for your health, but also delicious and incredibly versatile.

Before I began experimenting with using quinoa as a stuffing or filler, I wanted to begin with a basic quinoa salad recipe. I quickly found a recipe for Red Quinoa with Butternut Squash from the blog Gluten Free Goddess. Although this recipe sounded awesome, I wanted to adapt it slightly to make it my own. The result was my Butternut Squash and Cranberry Quinoa Salad. Satisfying and creamy with the chunks of caramelized butternut squash, with tangy bursts of freshness from fresh cranberries, and zesty bites of red onion, all immersed in sage-speckled quinoa. This recipe was delicious as a side with my dinner, not to mention the perfect leftover to pack up for my lunch at work the next day!

Adapted from Gluten Free Goddess.
Ingredients:
1 cup quinoa (rinsed)
2 cups vegetable or chicken broth
1 small butternut squash, peeled and diced
1 1/2 tbsp maple syrup
1 tsp garlic, pureed or minced
1 small red onion, diced
3/4 cup fresh or frozen cranberries
2 tbsp olive oil
3 sage leaves, chopped finely
1 tbsp red wine vinegar
1/4 cup pine nuts (optional)

Directions:
1. Preheat oven to 375º. In a medium baking pan, toss the squash with the cranberries, onion, and garlic. Drizzle with olive oil, and maple syrup. Season with salt, toss, and roast 25-30 minutes.

2. Meanwhile, in a medium pot, bring the stock and quinoa to a boil. Cover, reduce heat to low and simmer for 15 minutes. Remove cover and fluff with a fork.

3. Add the butternut squash mixture to the quinoa. Add the sage and red wine vinegar and toss to coat. Serve at any temperature.

Listening To:
Kanye West - All Of The Lights (Feat. John Legend, The-Dream, Ryan Leslie, Tony Williams, Charlie Wilson, El...

Powered by mp3skull.com

Tuesday, October 19, 2010

Ooey Gooey Cranberry & Coconut Lemon Squares


You know when you have a cold and the only thing in the world you feel like doing is curling up on the couch with a mug of tea, a bowl of chicken soup, a box of kleenex, and a marathon of old movies? You know that horrible sinking feeling when you realize you can't do any of that because you have to work every single day? You know how excited you get when you're managers kindly let you leave work early to go home and rest? You know that fantastic sensation of letting your body crash onto that couch...oh wait...I'm not familiar with that part. Last week, despite the fact that I was sick as a dog and all my body was telling me to do was rest, I decided to take a raincheck on that rest (leaving me still sniffling a week later), and bake (while washing my hands every 2 minutes!).

For Thanksgiving my mom had bought an extra bag of cranberries so that one of us could make a recipe for Cranberry and Coconut Lemon Squares that she found scribbled onto a loose sheet of paper tucked into her favourite cookbook with 4 stars drawn on the top corner. I knew those squares would be the perfect accompaniment to a cup of tea so I thought it would be the perfect thing to make on my "restful" day off. I realized that it probably wasn't the best idea to go off baking when my body was jacked with numerous cold and flu meds when I went to top the crust with the lemon filling. Something had clearly gone wrong. The crust looked like it could use a few more minutes in the oven, the filling was almost overflowing over the baking dish (if those squares had risen even a millimeter, I would have been screwed!), and there looked like there was too many cranberries. I guess those meds messed with my sense of perception because I had baked my squares in a pan way too small than the recipe had called for.

I nervously paced the kitchen as the squares baked, scared that I had wasted all those ingredients for defect squares. Finally the timer rang, I took the squares out, let them cool for a few hours, and then it was the moment of truth. I cut through the cooled dish to make squares and carefully lifted out each square. Eureka! The squares turned out even better than I remember the original squares tasting! The thicker squares with the same cooking time resulted in incredible messy, ooey, and gooey sweet and tangy squares that I couldn't get enough of! This is one mistake Ill be making over and over again in the future!

Note: If you prefer the texture of the original squares, simply bake them in a 9 x 13 dish instead and reduce the baking time of the crust to 20 minutes.

Ingredients:
Base
2 cups flour
1/2 cup sugar
1/2 tsp salt
2/3 cup cold butter, cut into chunks

Filling
4 eggs
2 cups sugar
1/2 cup freshly squeezed lemon juice
1/4 cup flour
1 tsp baking powder
2 cups whole cranberries
1 1/2 cups shredded unsweetened coconut

Directions:
1. For base, preheat oven to 325º. Grease a 7 x 11 baking dish.

2. Pulse the flour, sugar, salt and butter in a food processor until crumbly in texture.

3. Pat evenly into bottom of greased baking dish. Bake uncovered for 25 minutes.

4. Meanwhile, combine the eggs, sugar, and lemon juice in the food processor until combined. Add the flour and baking powder and blend until just combined.

5. Scatter cranberries evenly over the warm, baked crust, and sprinkle with coconut. Pour the lemon mixture on top.

6. Bake for 55-60 minutes, or until middle is set and edges are golden. Let cool and serve.

Listening To:
Gorillaz - Dirty Harry

Powered by mp3skull.com
(kicking myself for not going to their concert last Thursday!!)

Friday, October 30, 2009

Cooking with my Oma: Ginger Ale Glazed Ham

I remember the first time I tried my Oma's Ginger Ale Glazed Ham. I must have been in about grade 5 or 6, and we were having one of our last Thanksgivings celebrated at our cottage (we sold the cottage soon after). I never liked Thanksgiving. I thought the food always looked really gross, so my sister and I would beg our parents to stop at a McDonalds or Wendy's on the way up North. Well this particular Thanksgiving I felt daring and wanted give the food a try. I made myself a little sampling of everything, just enough for a very small taste of each item, sat down with my plate, took a deep breath and tucked in. It was like I was experiencing an epiphany! So THIS is what all that Thanksgiving fuss is about! This food is incredible!! I couldn't believe that I had wasted so many years without this amazing meal!

The food item that was on the top of my list was my Oma's Ginger Ale Glazed Ham. The ham was good and fine, but that sweet ginger ale and onion sauce, wow! Now that made it! I think I had at least 4 large pieces of ham that year, each with huge heaping spoonfuls of the ginger ale and onion sauce. This is one of my all-time favourite recipes. It tastes out of this world, and is very simple to prepare. I promise you, you will love it! Thanks to my Oma for sharing her special recipe with me...and for having the guts to add 5 teaspoons of sugar!


Ingredients:
half of a "fully cooked, ready to serve" honey & maple smoked boneless ham
1/4 cup ginger ale
5 heaping tsp sugar
3 tsp mustard
1 small onion, sliced

Directions:
1. Place roasting dish (large enough to fit the ham) on the stove set to medium heat. Preheat oven to 325º.

2. Coat bottom of dish with olive oil. When oil is hot, add the onions and cook, while stirring, until onions become soft and translucent. If onions are browning too quickly, turn down heat. Add the ginger ale, sugar, and mustard and continue to cook a few minutes longer until mixture thickens slightly.

3. Add ham to roasting dish and, using a knife, poke several holes throughout the top and sides of the ham.

4. Using a baster or spoon, pour the mixture from the bottom of the dish over the ham.

5. Place in oven and bake for about 20 minutes (just to reheat the ham through).

6. Remove the ham from roasting dish and cut into slices. The onions sauce should have darkened, and be very sticky and thick like a syrup. If the mixture is not at this stage yet, scoop out the onions, leaving the sauce in the dish, and transfer them to a small saucepan. Continue cooking the onions at medium heat until they become even softer, stickier, and darker. Once they have reached this stage, continue to add the sauce remaining in the dish, a little at a time, until mixture reaches desired consistency. It's really all in the colour and texture. You're looking for extremely soft and sticky onions and a deep golden colour.

7. Spoon the onion sauce into a serving dish. Eat the ham topped with onion sauce.

Sunday, October 18, 2009

Maple Pecan Squares

Last weekend I celebrated Thanksgiving with my family, which, for people who don't know me, is quite the occasion. Our Thanksgiving consists of my whole family coming together (we're talking aunts, uncles, cousins, grandparents, boyfriends, etc.) for an evening filled with appreciation for having each other and, of course, appreciation for wonderful food! The one thing that every member of my family can agree on, is that every holiday should be centered around delicious food! So for every holiday that we celebrate, we all come together, with each of us contributing to the meal in some way, to feast!

This year I offered to make a dessert. I wanted to make something with familiar Thanksgiving flavours, with a bit of a twist, that was easy to transport. This lead me to discovering William Sonoma's recipe for Maple Pecan Squares. Maple Pecan Squares are the perfect Thanksgiving treat filled with sweet and sticky maple syrup and brown sugar, a flaky crust, and crunchy pecans. The individual squares are like little handheld bites of pecan pie, making them less messy and easy to transport to your Thanksgiving festivities.

Ingredients:
Crust
1 1/4 cups flour
1/3 cup firmly packed brown sugar
1/4 tsp salt
8 tbsp (1 stick) cold butter
2 cups pecans, coarsely chopped

Filling
6 tbsp butter
1/3 cup pure maple syrup
2/3 cup firmly packed brown sugar
1/3 cup heavy cream

Directions:
1. Preheat oven to 350º. Carefully line a 9-inch square baking pan with aluminum foil, letting the foil extend up the sides and over the edges of the pan. Grease the foil liner.

2. In a food processor (or by hand), combine the fry crust ingredients: flour, brown sugar, and salt and pulse 2-3 times to blend. Add the butter and pulse until large, coarse crumbs form.

3. Evening press the crumb mixture into the bottom of the prepares pan.

4. Bake the crust for 12 - 17 minutes or until edges are lightly browned and firm to the touch. Set aside.

5. To make filling, in a saucepan over medium heat, combine the butter, maple syrup, and brown sugar and stir together until the butter melts and the brown sugar has dissolved.

6. Bring mixture to a boil for 1 minute and remove from heat. Immediately stir in the cream and pecans.

7. Pour the hot filling over the partially baked crust, spreading evenly.

8. Bake for 22-25 minutes, or until filling has set. Allow to cool for about 1 1/2 hours.

9. Using the ends of the foil liner, carefully lift the large square out of the pan. Remove foil from edges and cut the large square into desired sized individual squares. Store in an airtight container.