Friday, July 14, 2017

Making White Peach Sangria with Polar Ice Ontario Peach Vodka

The Spring and Summer seasons in Ontario are most definitely my favourite for more than just the beautiful weather, but for the incredible abundance of fresh and local produce available. Ontario produces some pretty spectacular fruits and vegetables during our warm months, but the one item that I look forward to more than anything is Ontario peaches. 

If you've ever had a ripe and juicy Ontario peach in August, you know that we make some of the best! Insanely sweet and flavourful, with juices that run down your chin, Ontario peaches are a treat in themselves, and an ingredient that I love to take advantage of in both sweet and savoury applications. 

With a few more weeks to go before I can get my hands on some Ontario peaches, I was delighted to get to try Polar Ice Vodka's new Ontario Peach Vodka! Made with 100% Ontario-grown peaches, and quadruple distilled and triple-filtered for a pure and smooth taste, this vodka is delicious on its own with some soda water and ice, but is taken to new heights when made into a fresh summer cocktail. 

On a beautiful summer day there is no beverage that I crave more than sangria! I love how refreshing and easy-drinking sangria can be (particularly for someone like me who doesn't drink a whole lot!), and I love catering the flavours in my sangria to the season. Polar Ice was kind enough to also provide me with a few recipes for using their new peach vodka this summer, and low and behold, they included a White Peach Sangria recipe! 

The most recent long weekend was the perfect opportunity to try the recipe out with some friends on my balcony in the sun. With Ontario peaches still a few months away, I chose to use frozen peaches for this batch, as well as some other berries that I had on hand in my fridge. I also added a little bit of ginger to give the sangria a bit of a zing, and some mint from my balcony garden for more freshness. The sangria turned out absolutely delicious! I loved how the Ontario peach flavour shone through the cocktail, making me even more excited for peach season. 

I will definitely be making this sangria again and again throughout the summer, but am also looking forward to playing around with different cocktails using Polar Ice Peach Vodka. I love the idea of adding a shot of peach vodka to a peach or ginger kombucha for a lil' kombuchatail, or making a boozier version of a bellini by adding both the peach vodka and Prosecco to peach nectar. As someone who's not a big drinker, Polar Ice Peach Vodka was a great option for me! I loved the smooth taste and the natural peach flavour, as I think we all know (and hate!) when an infused liquor has that awful artificial taste to it. This product is a limited edition flavour, sold exclusively in Ontario, with a limited number of bottles produced, so get your hands on it while you can and let me know what you think in the comments below. I would love to hear your suggestions for what other cocktails I can make with it! 

White Peach Sangria
Ingredients:
fresh or frozen peaches (and any other fruit you have on hand that you may want to add)
2 Tsp. fresh ginger, grated (optional)
a handful of fresh mint leaves (optional)
1 cup Polar Ice Ontario Peach
1 750 mL bottle of Pinot Grigio
1 L ginger ale

Directions:
  1. In a large pitcher/vessel, gently muddle the fruit with the ginger and mint (optional).
  2. Add Polar Ice Ontario Peach, Pinot Grigio, and ginger ale. Stir, add ice, and enjoy in the sun! 
Listening To:
Tuesday, July 4, 2017

Snack Hacking with Nosh & Co. and Devin Connell

Snacking and food hacking are two things that I have a lot of experience in. As you may know, a couple years ago I was Kraft Canada's Official Food Hacker for their Food Hacks campaign, which meant scouring the internet for every possible food hack I could find. I learned so many different food hacks during that time, some good, some not so good, and it was clear to see that the best food hacks were those that were simple, convenient, and made cooking more enjoyable. Having ended the Food Hacks campaign a couple years ago, I still love coming across new food hacks that I haven't yet discovered.

I was super pumped to have the opportunity to add a few more hacks up my sleeve, when I was invited by Rexall Canada and Nosh & Co. to join TV personality, entrepreneur, and recipe developer Devin Connell as she led a mini cooking demo on her favourite snack hacks. What I loved about Devin's snack hacks was that they were not about utilizing gimmicky methods or kitchen tools just to be "hacky." Devin's type of hacks were about real life tips and tricks that make healthy and guilt-free snacking easy! 
The first recipe that Devin led us through was how to make the dry mix for her Pumpkin and Sunflower Seed Banana Bread. The banana bread, which Devin baked into mini, individual loaves (perfect for those snack cravings!), allowed us to understand how we can utilize other healthy ingredients in our kitchen to sweeten up and add flavour to healthy treats. The banana bread contained zero added sugar, allowing the natural sweetness from the overly-ripe bananas to sweetened the loaves. The addition of Nosh & Co. Unsalted Roasted Shelled Sunflower Seeds and Roasted & Salted Pumpkin seeds added a fantastic crunchy texture to the loaves, with the pumpkin seeds adding just a hint of saltiness. 
The second recipe that Devin led us through was how to make her Fruit & Nut Mix Power Balls. Not only were the Power Balls insanely simple to prepare, they were also delicious, and actually very filling! This was definitely my favourite hack of the day, and one that I can see myself using all the time! I've been turning to those Power Balls ever since the event, as my new favourite late-afternoon treat to sustain my appetite before dinner. 
The final hack of the day allowed us guests to prepare our own signature trail mix using a selection of Nosh & Co. nuts and trail mixes, as well as some other healthy and tasty ingredients. Devin loves to layer her ingredients into a mason jar, shake it up to disperse, and keep the jar in her car for snacking emergencies. More than just sweet ingredients, Devin also gave us the great idea of creating our own savoury trail mixes. With ingredient such as spiced chickpeas, shredded seaweed, and salty pumpkin seeds available, the savoury trail mixes were just as satisfying as the sweet ones! 

I had such an awesome time at this event, and more importantly, I really loved the tips and tricks I learned from Devin that I can actually see myself applying to my daily routine! I have included the recipes for you below and encourage you to try them! Let me know what you think in the comments! 
Pumpkin & Sunflower Seed Banana Bread
Ingredients:
Dry Mix: This mixture can be kept in an air-tight container at room-temperature for up to one-month. Double or triple the recipe to have some on hand for last-minute muffins
1 1/2 cups gluten-free flour
1 Tbsp. baking soda
1/2 tsp cinnamon
1/4 tsp kosher salt
1/4 cup Nosh & Co. Unsalted Roasted Shelled Sunflower Seeds
1/4 cup Nosh & Co. Roasted & Salted Pumpkin Seeds
Wet Mix:
4 very ripe bananas (like really ugly and brown)
1/2 cup melted coconut oil, plus more for greasing the tin
2 extra large eggs
1 Tbsp. vanilla extract

Directions:
  1. Preheat oven to 350ºF. Grease loaf pan or muffin tins with melted coconut oil.
  2. In a large bowl, sift together gluten-free flour, baking soda, cinnamon, and salt. Push any remaining kosher salt through the sieve. Stir in sunflower seeds and pumpkin seeds.
  3. In a separate bowl, mash bananas very well with a fork until very soft and almost liquidy. Whisk in coconut oil and eggs until well incorporated.
  4. Add dry ingredients to wet ingredients and stir with a large spoon until just mixed together. Do not over mix.
  5. Spoon batter into prepared loaf pan or muffin tins until 3/4 full.
  6. Bake 45-minutes for the loaf or 20-minutes for muffins. 
Fruit & Nut Mix Power Balls
Ingredients:
1/2 cup Nosh & Co. Raw Fruit & Nut Mix
1/2 cup dried coconut (unsweetened)
1/2 cup sunflower seed butter (may sub almond butter)
2 Tbsp. honey
1 Tbsp. water
1/4 cup chia seeds
1 cup rolled oats

Directions
  1. In a food processor, combine the fruit & nut mix, dried coconut, sunflower seed butter, honey and water. Periodically stop the machine, and scrape down the sides of the bowl.
  2. Once blended, the mixture should not be chunky, but still have some texture to it.
  3. Place the mixture into a large bowl. With a large spoon, mix in the chia seeds and oats. The mixture will resemble a loose crumble.
  4. Grab about 2-Tbsp. of mixture and, using your hands, form into a ball. Continue with remaining mixture. Power balls can be kept in an airtight container in the fridge for up to one week. 
Listening To:

Tuesday, June 20, 2017

Adelaide Eats 2017

The Adelaide Eats food market is BACK for it's third year in a row, and I'm here to give you the inside scoop on what you should be checking out! Located right in the downtown core, on the second floor Terrace of Adelaide Place, Adelaide Eats is the perfect destination for those working in the financial district to grab a quick bite on the go. With over fifteen restaurant options to choose from, it's easy to feel overwhelmed by all of the delicious choices. Having visited the market last year, I knew to try and come up with a game-plan this time around, so that I could be sure to taste as much as possible, without getting too full! 
After trying (almost!) all of the tastes that Adelaide Eats had to offer, I of course had a few favourites. Momofuku was a welcome addition to the market this year, serving up their famous pork belly and chicken steamed buns. Though I've had Momofuku's steamed buns before, they were just as wonderful as always, and stood out as one of my favourite tastes of the night. 
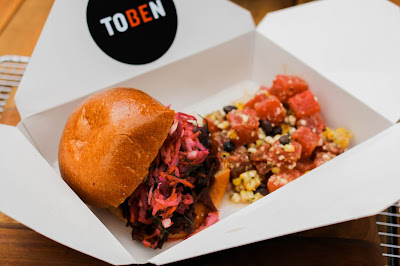
Though I'm generally pretty skeptical when it comes to brisket sandwiches, I was curious to try Toben Food By Design's Brisket Sandwich. I'm so glad I did, because it turned out to be one of the best brisket sandwiches I've ever had! It was particularly lovely when paired alongside their refreshing Compressed Watermelon Salad with corn, black beans, and feta. This duo is definitely a must-try! 
After enjoying two fairly heavy options, I was ready for something lighter before going back for more gluttony. Though I had never heard of Cassia before (they do Thai pop-ups throughout Toronto), I really enjoyed their Thai Papaya Salad. Not only was it delicious, each dish was prepared to-order, with our chef taking out a pestle and mortar to grind the herbs and spices right before serving! I highly recommend checking them out, as it may be tricky to find them anywhere else! 
I was a little shocked at how much I enjoyed Wahlburgers burger. I'm pretty picky with my burgers, and have been talking a lot of smack about Marky Mark daring to bring his burgers to Toronto to rival our dear Burger's Priest, Stockyards, Holy Chuck, The Drake, and more. I gotta give Marky Mark some credit, he does make a good burger (though no, it ain't no Priest!), and what's more, he completely won me over with his crunchy on the outside, and soft and tender interior tater tots! Man, were those ever addictive! 
Of course, no market would be complete without some refreshing beverages! While I chose to sip on a little sangria (they were serving both red and white sangria), my sister Justine chose to enjoy a few brews from The Mervchant Tavern, trying both the Goose Island IPA and Mill St. Organic. Fear not, wine drinkers, The Merchant Tavern has you covered as well, serving Peller Estates Chardonnay and Cabernet-Merlot. 
I'm really glad to have had the chance to try out all of the delicious offerings at the market and am looking forward to coming back throughout the summer! Be sure to check out the market from now until July 28th located at 150 York St. 

Listening To:

Friday, June 16, 2017

Raw Shaved Asparagus Salad Two Ways

Being such a food-focused province, the winter months have a way of taking its toll on us Ontarians, having to endure months and months of minimal options and repetition when it comes to local produce. There's no better sight than the first discovery of local asparagus at the market, as it has become a signifier for the beginning of Spring and all of the seasons big, fresh flavours for Ontarians.
With asparagus at its peak in the Spring, there's no better time to turn off the heat and play around with different raw preparations for this healthy and flavourful green. Serving asparagus raw allows its true flavours to shine through, as well as taking advantage of its fantastic  crunchy texture. This recipe lets asparagus act as the star, dressing it in a light vinaigrette that highlights asparagus's natural flavours, without overwhelming it. More than that, this recipe gives you the option of serving the salad two ways; standing along, garnished with pistachios and parmesan cheese, as a light accompaniment to lunch or dinner; or as an appetizer, using it as a topping for goat cheese crostini.

This article was originally posted in Fredi Magazine. CLICK HERE to check out the spread!

Tip: Save any remaining dressed salad to add into an omelette the next day!

Ingredients:
2 lb thick asparagus spears, trimmed & peeled into ribbons
Salad Dressing
1/4 cup extra virgin olive oil
1 1/2 Tbsp. fresh lemon juice
1/4 tsp Dijon mustard
1 tsp mint, cut into very fine ribbons
salt and pepper to taste
Salad
2 Tbsp. chopped pistachios, lightly toasted
shaved parmesan cheese, for garnish
Crostini
8-10 thin slices baguette, cut on a bias
olive oil
about 1/2 cup goats cheese

Directions:
  1. In a small bowl, whisk together olive oil, lemon juice, Dijon, and mint, and season with salt and pepper.
  2. In a medium bowl, add asparagus ribbons. Add 3/4 of dressing and toss. Taste, and add remaining dressing as needed. 
  3. Divide salad in half. Plate half garnished with pistachios and parmesan cheese shavings and serve as a salad.
  4. Use the remaining half of the salad for topping the crostini. Lightly brush baguette slices with olive oil and lightly toast or grill. Spread evenly with about 1-Tbsp. goats cheese each, and top evenly with remaining asparagus salad. Serve immediately. 
Listening To:

Thursday, June 15, 2017

How To Be A Food Hero - Make French Toast with Old Hot Dog Buns

The other day I posted an Instagram Story of me making Hot Dog Bun French Toast. That's right. No challah. No brioche. No fancy bread from some cute bakery. We're talking dirty, Wonderbread hot dog buns, bought on sale, and stale as shit. So appealing, right? 

I know it's not the most glamorous of dishes, but guys, this is straight up real life! This is how you live on that Budget-Life (can I get an *amen* emoji!), cut down on food waste, and get food in your belly when it seems like there's nothing to eat. This is also how I cook a lot of the time. 

I remember making this for Chris years ago when he first moved into the condo that we now live in together with his then roommate, Adam. They didn't have a ton of food in the fridge and pantry, and would often make due with cereal, cans of tuna, hot dogs, and takeout. When we would get hungry when I was over and I would offer to cook something, I was often met with "there's nothing to eat and nothing to make it with." Little did they know, they were dealing with a food hero! 

I remember seeing the look of amazement on Chris's face when I first macgyvered together french toast using old, stale hot dog buns. Just five minutes prior he was convinced there was no food, and was about to throw out those old hot dog buns. No, it was definitely not the best french toast ever, but yeah, it was good! Dunk anything in custard, fry it in butter, and top it with maple syrup and you'll be a happy camper! 
This time I also had some overripe strawberries that were about to go mouldy that elevated the humble hot dog bun french toast even further. Hell, I bet you can't even tell how shameful the bread is in the photo, it turned out so good! It's funny that I've been using these food waste tricks and hacks for years, but have kept many of them to myself, scared that people may shame me for breaking the rules or using less-than-popular food ingredients and products. I'm so glad that this time I decided to not give a shit, and just put my real self out there, because this seems to be what my viewers/readers really respond to! I was amazed at how many people replied to my story, telling me how much they hate food waste, how creative they thought that idea was, and encouraging me to post more! That was very cool! 

So the next time you're clearing out your kitchen, and tossing anything deemed "inedible," please take a moment to reconsider what you're doing. Ask yourself, "can I use this item in any other way before it turns to garbage?" Not only could you end up creating something delicious (and potentially genius!) you will also be able to rest easy knowing your hard earned money was well spent, and the good food that we are so fortunate to be able to have did not go to waste! 

What items do you find yourself wasting the most in your kitchen? Let me know in the comments below and maybe I'll have a solution for you! Also be sure to follow me on Instagram to watch more of my food waste tips and tricks on my Instagram Stories! 

Listening To:

Tuesday, June 6, 2017

Celebrating National Iced Tea Day with Teapigs

Photo courtesy of Craft PR
Alcohol and I have a bit of a love/hate relationship. While I love the taste and refreshment of certain cocktails and ciders, and love sipping on a good glass of wine or bubbly, alcohol doesn't always sit very well with me. Over the last year or so, I've had to get more selective about which alcohol I choose to drink and most definitely how much. With this being said, I've had to turn down a lot of events and promotions this year, knowing that I wouldn't be unable to fully take part. Long gone are the days of getting silly at Beer Fest with my sister, and tasting five drinks in an afternoon at a cocktail competition. In all honesty, other than causing shenanigans with my sister at Beer Fest, I really haven't missed all those other events very much. 

As the weather begins to (slowly) get warmer, I've found myself craving refreshing, summertime sippers, that feature just enough alcohol to relax me, but not enough that I don't feel like myself. As though the universe heard my cries for summer sippers, I was promptly invited to Teapigs early celebration of National Iced Tea day (which takes place on June 10!) at Figo last week. With Teapigs fragrant iced teas as the star of the event, I knew I would be in good hands to be able to enjoy the event and featured drinks, without feeling uncomfortable. 
With my favourite +1 in tow (my sister, Justine!) we walked into a very buzzing Figo and headed straight to the bar to check out the cocktail offerings. Just as I had hoped, the event featured very "Danielle-kinda-cocktails," meaning bright, refreshing, and low on booze...with one mocktail option to boot! The first cocktail I tried turned out to be my favourite! The Ginger Collins was a zingy and citrusy cocktail featuring Teapigs Lemon & Ginger Tea, St. Germain Elderflower Liquer, Benedictine D.O.M., lemon juice, and soda water. As much as I wanted to try the two other cocktails being prepared that night, I would have been perfectly fine just sipping on my Ginger Collins all evening, as it was exactly what I was looking for! 
I was glad that I branched out from the Ginger Collins once I tried the next cocktail, the Super Fruit Punch. Though it was slightly boozier than the Ginger Collins, it was just as refreshing and incredibly delicious! Featuring Teapigs Super Fruit Herbal Tea, lemon juice, Ketel One Vodka, and Peche de Vigne, I could definitely see myself sipping on this one on my balcony on a hot summer day. Though I loved the Ginger Collins the most, I can think of a number of friends who would go crazy over the Super Fruit Punch! 

Though I had thought that the mocktail may turn out to be my favourite, I have to admit...I didn't like it. The mocktail prepared was called a Marrakesh Mocktail and featured Teapigs Marrakesh Green Tea with Peppermint, apple juice, lemon juice, and pineapple and star anise bitters. While all of the flavours sound like they would create a drink I would like, I found the peppermint flavour from the tea incredibly overwhelming. Though I didn't like the cocktail prepared with the Marrakesh Green Tea with Peppermint, I have since tried brewing the tea on its own, and actually really loved the tea itself. I guess I just wasn't a fan of the mocktail as a whole...sorry to the mixologist. 
Photo courtesy of Craft PR
Thank you so much to Teapigs and Craft PR for inviting me to take part in this event, and for sending me home with a bag full of amazing-smelling Teapigs teas! I'm so excited to make the Ginger Collins and Super Fruit Punch at home for my friends and family this summer! To help you get your summer sippers on, Teapigs was kind enough to give me the recipes for their cocktails to share with you as well! Be sure to make one on June 10th to celebrate National Iced Tea day! 
Photo courtesy of Craft PR
Ginger Collins
Serve: In a pitcher
Glass: Collins
Ice: Cubed
Garnish: 3 lemon wheels down the side of the glass
Ingredients:
10 oz. Teapigs Lemon & Ginger Tea (4 tea temples) (chilled)
5 oz. St. Germain Elderflower Liqeur
1 1/4 oz. Benedictine D.O.M. (or omit and add 1 oz. more simple syrup instead)
2 1/2 oz. Fresh lemon juice
2 1/2 oz. Simple syrup
Top with soda water to your liking

Directions:
  1. Brew 4 cups of Teapigs Lemon & Ginger Tea. Steep for longer than you would for a regular cup of tea to ensure the flavour stands out - 10-minutes. Remove tea temples and chill before use.
  2. Add all ingredients, except the soda water, into a pitcher filled with ice. Add garnish and stir until all ingredients are mixed.
  3. Top with ice and soda water. Pour into a Collins glass to serve.

Photo courtesy of Craft PR
Super Fruit Punch
Serve: In a pitcher
Glass: Collins
Ice: Crushed
Garnish: Half strawberry & sage leaf
Ingredients:
12 oz. Teapigs Super Fruit Herbal Tea (4 temples) (chilled)
2 oz. Fresh lemon juice
3 1/2 oz. Ketel One Vodka
3 1/2 oz. Peche de Vigne
2 1/2 oz. Simple syrup 

Directions:
  1. Brew 4 cups of Teapigs Super Fruit Herbal Tea. Steep for longer than you would for a regular cup of tea to ensure the flavour stands out - 15-minutes. Remove tea temples and chill before use.
  2. In a pitcher filled with crushed ice, add all ingredients and stir. 
  3. To serve, pour into a Collins glass and garnish with half a strawberry and sage leaf.

Listening To

Wednesday, April 26, 2017

Fresh City Farms Ready-To-Eat Jars

Cooking is my thing. It's my stress reliever, my creative outlet, my pride, my joy, it's my world. While I love to cook as much as possible and share my creations with you all, it's not always a reality for me to get to cook every single meal. Short-cuts and quick-fixes are the only way I can get through a busy week without losing my mind sometimes. I'm often juggling a few different projects at once, which means a lot of running around, and bursting in the door well past dinner time, in a hangry stupor, searching for anything that can satiate me quickly! It's so easy to make poor choices when I'm caught in a hangry state like that, turning to my guilty pleasures (that always feel so good at first, and then inevitably leave me feeling disappointed) like a box of mac & cheese, a McDonalds meal, or just some good ol' peanut butter toast. Like I said, those options always seem like a good idea while I'm preparing them, but they always (and I mean always!) leave me feeling lousy and let down in the end. 

While I've been getting better at meal prep as of late, I still have those days where I need to have a meal on hand that's ready to go and will leave me feeling my best. With that in mind, an email from Fresh City Farms, inviting me to try out some of their new Ready-To-Eat meal jars came at the most opportune time!

Having visited Fresh City Farms two-acre Organic farm at Downsview Park (right in the city!) a few years ago, I knew first-hand the care and thought that they take in producing and sourcing some of the best produce you can find in Ontario. While they don't source all of their ingredients for their Ready-To-Eat jars from their own farm, they take great care to select almost exclusively certified organic ingredients, with exception of a few local producers who are not certified organic.
Beyond being impressed by the attention and importance that they place on having high-quality produce, I was also dazzled by the great selection of Ready-To-Eat jars that Fresh City Farms carries in their shop. With so many delicious sounding options (that fit a variety of different diets), the hardest part of the whole process was buckling down and getting decisive about my order. I wanted to try them all!! I ended up ordering the Butter Chicken Bowl (a total no-brainer!), Makhani Tofu Biryani, and Falafel Salad, with jars for Chris to try out as well for a second opinion. I also threw in some Tonica Kombucha, red beets, rutabaga, and Dark Chocolate Peanut Butter Cups from Green Zebra Kitchen. What a haul!

With my order placed, I was a little concerned that I would run into problems with my delivery. Both myself and Chris were going to be out the day our order was to be delivered, and my condo clearly states that they will not accept any deliveries that include non-perishables. I left instructions for the delivery person to call our buzzer and leave the order outside of our unit door. Even still, I wasn't sure that either Chris or myself would even be available to answer the buzzer to let the delivery person in. I was stressed! Luckily my stress was completely unfounded, as the delivery process was as smooth as can be! I got a phone call from Fresh City Farms to confirm my order was being delivered, and they were able to get into my building without any issue. Chris came home to find a lovely Fresh City Farms cooler bag, expertly packed with temperature controlled lunch bags and ice packs. For someone who works in marketing, Chris was seriously impressed!

I came home from work that evening completely starved and ready to dive into my Butter Chicken Bowl! A quick trip to the microwave was all my bowl needed to be ready to eat. It was such a perfect meal to come home to. I loved the big, bold, and comforting flavours of the butter chicken sauce, and the chicken was perfectly cooked and tender. With the jars being quite large, I even had some leftover as a snack the next day!
While the Butter Chicken jar was definitely my favourite, the other two jars were really tasty as well. Though I have to admit, I did end up adding some extra ingredients to the Falafel jar to bump up the flavour a little bit. I added chopped cilantro, a squeeze of lemon, a drizzle of tahini, and a little hit of cayenne pepper for heat. I dunno, maybe it's just me, but I wanted a little bit more brightness, creaminess, and heat. I LOVED it after that! I have also been totally obsessed with kombucha since trying Tonica Kombucha from my order, and have been drinking it like a maniac ever since! My favourite flavour is their peach kombucha. I was also shocked by how delicious the Peanut Butter Cups were from Green Zebra Kitchen. My goodness, they were sooooo good! Not only were they tasty, they're also healthy and provide a quick energy boost thanks to the hit of protein in them. 

I am so happy with how my experience with Fresh City Farms went! It was easy, convenient, delicious, and at a fairly reasonable price-point considering the quality, organic certification, and delivery right to your door! I would highly recommend looking into their delivery service if you're anything like me and are looking for tasty and convenient options that will leave you feeling great in the midst of a busy week. Thank you so much to the lovely people at Fresh City Farms for reaching out to me and allowing me the opportunity to try their products!

This post was written in partnership with Fresh City Farms. All opinions and photographs are my own. 

Listening To:
Kendrick Lamar - XXX

Monday, March 27, 2017

Peter & Pat's Bacon & Cheddar Cheese Pierogies with Bacon & Brussel Sprouts

Hangry, a perfect word for summing up the overwhelming feeling of anger in response to hunger, and an emotion that you never want to catch me in the midst of! It's unpleasant, to say the least. In order to prevent unnecessary hangry episodes in my home,  I have to keep my kitchen stocked with quick and easy midweek dinner options so that I can get food into my hangry mouth as quickly as possible on busy evenings. Of course we will always have our shameful boxes of mac and cheese and instant pancake mix, but it's important for me to keep more "legit" options in my freezer as well. This is where I keep my store-bought asian dumplings, trays of homemade lasagna, chilli, and soup, and, one of my favourite go-to's, frozen pierogies! 

Frozen pierogies have come to be one of my all-time favourite weeknight go-to meals thanks to how convenient they are to store, their simplicity, satiety, delicious taste, and versatility. The amazing thing about pierogies is just how versatile they are. They come in so many different flavours, but more than that, the options for serving and topping pierogies are endless! 

Recently Peter & Pat's Pierogies reached out to me to introduce me to their line of Bacon & Cheddar Cheese Pierogies made from a 60-year old family recipe, with 100% real potatoes, and 100% natural ingredients. Disappointed with the usual pierogies I was buying at the grocery store, I was eager to try out Peter & Pat's product, which are now available for purchase at Costco locations throughout Canada. Not only did Peter & Pat's Pierogies provide me with a sample of their product, they also sent along a few recipes for me to try out with their pierogies! 

While I have always loved serving my pierogies with sautéed bacon and onions, with a big ol' dollop of sour cream, the combination of the bacon and sour cream (plus all of the bacon, potato, and cheese inside the pierogies) made the dish a little heavy for a weeknight meal. I loved Peter & Pat's suggestion to try the pierogies with sautéed brussel sprouts, with bacon and onions. Though the suggestion was to serve the perogies with quartered brussel sprouts on the side, I thought it would be even more delicious to serve just the sautéed brussel sprout leaves tossed right into the pierogies. Though it was a bit of an odd combo that I had never thought to try before, the brussel sprout leaves tasted so delicious with the pierogies, especially when combined with the bacon and onions. The brussel sprout leaves were fantastic for cutting all of the richness in the dish, giving it a really nice balance. 

More than just the serving suggestion, I was really impressed with the flavour of Peter & Pat's Pierogies. That 100% potato flavour came through really strong, with the flavour of the bacon and cheddar cheese merely complimenting the potato filling, as opposed to overwhelming it. I love how the potato remained the star! The pierogies also had a great texture, and featured the signature crimped edges that you find with homemade pierogies. I will definitely continue to keep their pierogies stocked in my freezer from now on! 

Be sure to keep your eye out for Peter & Pat's Bacon & Cheddar Cheese Pierogies at your local Costco, and try out the recipe for Pierogies with Bacon & Brussel Sprouts below! You're gonna love it! 

* Cutting bacon into lardons means slicing it into paper clip-sized pieces.

Serves 2
Ingredients:
14-20 frozen Peter & Pat's Bacon & Cheddar Cheese Pierogies
about 12 brussel sprouts, leaves picked, core discarded
4 slices bacon, cut into lardons*
1/2 medium onion, fine dice 
2 Tbsp unsalted butter, separated 
salt and pepper

Directions:
  1. Boil pierogies as directed on package. Drain and set aside. While pierogies are cooking prepare topping. 
  2. In a large nonstick skillet, cook bacon at medium heat until fat has rendered. Remove with a slotted spoon, and set aside on a paper-towel lined dish. 
  3. Drain fat from pan, leaving 1-Tbsp. Add onion and cook for 1-2 minutes until softened. Remove to a bowl with a slotted spoon. 
  4. Add 1-Tbsp butter to pan and add brussel sprouts. Cook, stirring often, until leaves are slightly crisp and charred on the edges. Season with salt and pepper. 
  5. Add remaining 1-Tbsp butter along with pierogies, bacon, and onion to the brussel sprouts and toss to combine. Serve immediately. 
Listening To:

Thursday, March 23, 2017

What We Dig Checks Out Southern Accent

Tonight I'm off to shoot another episode of What We Dig, but before I get to try another type of cuisine, I wanted to share with you the last episode that I got to co-host, at the new location of Southern Accent

My sister has lived in the Annex area for years, so Southern Accent came to be one of our favourite go-to restaurants in the area. I was always a sucker for their fried calamari, brisket with grits and collards, and, of course, their famous bourbon sours, so it was really fantastic to get to visit their new location on College Street, and try a few dishes that were previously unfamiliar to me. 

I had such an amazing time filming this episode with the lovely Debbie Dear, and was completely blown away by the unbelievable southern hospitality that all of the staff welcomed us with. Big shoutout to Wendy from Southern Accent who went above and beyond to make our experience special. Wendy was a very familiar face from their previous location, and it was so nice to see her taking on that same role of "the host with the most" in their new home.

Have you ever eaten at Southern Accent before? What's your favourite dish? Tell me about it in the comments, or tweet me: @thisgingerrose

Listening To:
Passionfruit - Drake

Thursday, March 9, 2017

Recreating Israeli-Style Falafel & Hummus At Home

If you've ever traveled to Israel, you'll know just how drastically different our falafel and hummus is here in Toronto. It would be an understatement to say that Toronto falafel and hummus are "just not as good," because, my lord, it's like an entirely different animal! I often say that Israel ruined me for falafel and hummus, because now I don't want to eat it anywhere else. We're lucky being in such a multicultural "food" city to have a few good options here and there (hello, Dr. Laffa, Famous Laffa, and Fat Pasha!), but it's not always easy to get to Bathurst and Lawrence for fresh laffa bread and creamy hummus, and as much as I love Fat Pasha, it can be a little hard on the budget at times. 

Two weeks ago, after a week of daydreaming about perfect fresh falafel balls and creamy hummus, I got inspired to finally try my hand at making my own falafel and hummus at home. I did a little bit of research online and found a recipe for falafel that sounded great, as well as a recipe for hummus that appeared to be just as creamy as the dips I devoured all over Israel. Being a last-minute decision to make both dishes, I unfortunately didn't start out with dried chickpeas, and had to settle for canned, and hoped to the Israeli falafel Gods that it would all work out. 

The falafel recipe I found was from an excerpt from Joan Nathan's book The Foods Of Israel Today on Epicurious, and caught my attention thanks to Nathan's description of her favourite falafel in Israel. Though I can't recall the exact name of the place where I had the best falafel that has ever touched my lips, I do remember what made it so special and how it made me feel. Nathan's description of her favourite falafel reminded me of my experience biting into my very first Israeli falafel (which just so happened to be the best of the whole trip!), and made me trust that her recipe would be a winner! The great thing about preparing falafel at home, is that you can prepare almost everything in advance and just quickly fry-to-order and assemble when ready to serve. 
The hummus recipe that I landed on was from Chef Michael Solomonov from the Israeli restaurant Zahav in Philadelphia, featured in the New York Times. With an emphasis in the description and Zahav's reviews on their unbelievably silky and creamy hummus, I was confident that this recipe would be a good starting point. 

Because hummus is incredibly simple to prepare, it's the little details that make all the difference in terms of achieving those dreamy creamy results. One of the biggest tricks to achieving silky smooth hummus is to over-cook your chickpeas and remove all of the skins. Starting with canned chickpeas, they were already quite soft and I was able to skip the step of boiling them until soft to the touch. Unfortunately, I still had a lot of work ahead of me in terms of removing the skins. I knew that I could easily remove most of the skins by rubbing the rinsed chickpeas in a clean towel, but I suppose I wanted to make things difficult on myself, and decided to remove each one individually. This was a mistake.

I put all of my chickpeas in a bowl of water and rubbed them with my fingers, hoping that all of the skins would float to the top. When the surface of my water was covered in chickpea skins, I figured they must all be off. I was sadly mistaken. I proceeded to check every single individual chickpea by pinching it between my pointer-finger and thumb to remove any remaining skin. It was crazy to see how many chickpea skins still remained! It was tedious and boring as hell, but absolutely worth it! I was determined to make that same wildly creamy hummus that I had been dreaming of! 
The second trick to achieving the ultimate creamy hummus is to add ice water when blending. Truthfully, I don't know why. It just works, and I'm not going to question it! It's what Anthony Rose taught us to do at the Metro & Fat Pasha cooking demo that he held at Taste of Toronto this summer, and it is what I will continue to do. 

I have to admit, after removing all of those damn chickpea skins, I announced "I'm over it!" and wanted to just collapse on the couch. Once my falafel mixture and hummus were in the fridge, I was worried that I still had a lot of work ahead of me frying up the falafel balls. I was lazy, and wanted to just relax, but I knew that after all of my hard work, I had to finish the dish. Thank goodness these falafel balls were actually the easiest things I have ever fried in my life! It was so fast, clean, and simple, we were eating our falafel in no time! 

I always want my final dish to taste spectacular, but when it's the first time making it, I expect that there will always be something that wasn't quite right. Though I do want to work on the hummus recipe a little bit (it was great,  but needs a bit of tweaking), the final falafel in pita (with all of the fixings, of course) was out-of-this-world, ridiculously delicious! Oh my God, guys, Chris and I were losing our shit, it was so good! We stuffed our faces, and ended up having two giant falafels each, even though we were so full, because we wanted to taste more. This will likely go down as one of my favourite things I've ever made, and am so incredibly excited to make it again! The next time I make it, I will most definitely be making it for friends and/or family, because it's not only a show-stopper, it's also so convenient to be able to prepare so much so far in advance. 

Remember: You can't always sub dried chickpeas equally for canned. Remember that canned chickpeas are already cooked, meaning that their volume has increased from the cooking process. A general rule-of-thumb is that 1-cup of dried chickpeas should equal roughly 3-cups of cooked chickpeas. Read every recipe carefully to see if they are referring to the volume of cooked or uncooked chickpeas, and if something feels off, trust your gut! 

Check out the recipe for Joan Nathan's favourite falafel, featuring fresh parsley and cilantro here.

Check out Zahar's super-silky hummus recipe from The New York Times here.

Listening To

Monday, February 27, 2017

Jumping On The Buddha Bowl Bandwagon

Go on any health-focused food blog and you will find some version of a brightly coloured Buddha Bowl. Come to think of it, do a quick scroll through your Instagram on any given weekday, and you're bound to find an image of some sort of Buddha Bowl there as well. It's clear to see that everyone is doing the Buddha Bowl, and it was my time to jump on the mindful eating bandwagon!

I'm big on eating leftovers for lunch, but not every dinner leaves me with enough tasty leftovers that I can work into a full lunch, meaning that I often turn to unhealthy quick-fixes that generally leave me feeling guilty, lethargic, and not very satiated. With some time to spare one morning last week, I figured I would take the time to jump into some food prep to get my Buddha Bowl game on for the week! Though my fridge didn't feel stocked, it was easy to come up with enough ingredients to make a delicious and satisfying bowl that I would feel excited to eat a few days in a row. 
I started by cubing up some sweet potato, tossing it in some herbs and spices, and throwing it into the oven for 20-30 minutes to roast. While my sweet potato cubes were tenderizing in the oven, I whipped up a few servings of quinoa with some homemade vegetable stock that I had ready in the freezer, and tossed some canned chickpeas in some spices and heated them up on the stove. By the time I had some sugar snap peas and cilantro chopped, and a tahini dressing whirred in the blender, my sweet potatoes, chickpeas, and quinoa were all ready! It was just that easy and fast. Throw everything in a bowl, drizzle it with dressing, and sprinkle with cashews and you've got yourself healthy and satisfying lunches for days! This dish is so simple and easy, there's no need to include a recipe at all! I just listed the ingredients, and even that is up for you to play around with. Use whatever ingredients you have on hand to make your Buddha Bowl work for you! How do you Buddha Bowl? 

Ingredients:
cooked quinoa 
roasted sweet potato, cubed
spiced, warmed chickpeas
sugar snap peas, sliced on a bias
lightly salted cashews
cilantro, finely chopped

Directions:
  1. Place quinoa in a bowl and top with sweet potato, chickpeas, and sugar snap peas. Drizzle with dressing and sprinkle over cilantro and cashews. Serve. 
Listening To:

Wednesday, February 22, 2017

Salted Bourbon Chocolate Chip Cookies

You've heard the saying, perfection doesn't exist. As much as oftentimes we can have our own idea of what a perfect version of any particular thing is, we know that that idea of perfection is likely to be different from the person next to us. We all have a different perception of what perfection is. For example, while I felt that Beyoncé's Lemonade was a perfect album (even though I skip 'Sandcastles' every time it comes on), the Grammy judges felt that Adele's 25 was closer to excellence. I think it's crazy, but hey, we all have our own opinion of what's perfect. This is especially true when it comes to food, and most specifically, the beloved chocolate chip cookie.
Image by Chatelaine
Over the past year I've kept seeing charts breaking down "cookie logic," otherwise known as the "lite" science behind what makes a perfect chocolate chip cookie. From looking at these charts, I discovered that my idea of a perfect chocolate chip cookie is very different from say, Chatelaine Magazine's. In Chatelaine's chart (shown above) they believe that the perfect chocolate chip cookie is represented in the bottom right cookie. While I certainly wouldn't turn down a bite of that cookie, I felt the top left or right cookies were both closer to my idea of perfection. Using the search terms "perfect chocolate chip cookies" on some of my favourite food websites, I found an array of all sorts of different cookies that respected foodies deemed "perfect." It really puts in perspective how delusional the idea of universal perfection truly is.

For myself, my ultimate "perfect" chocolate chip cookie is a thin cookie with both semi-sweet and/or dark chocolate chips and pieces, with slightly crisp edges, a soft interior/centre, and some salt to combat the sweetness. I remember seeing an image of what I would have considered to be "perfect" chocolate chip cookies in an old William's Sonoma Cookies cookbook that I adored. They were those same thin cookies that I just described, and to me they looked like heaven. I never even made them, more swayed by the assortment of other interesting cookies that were unfamiliar to me, and have now misplaced my cookbook, but in my head those thin chocolate chip cookies will always be my idea of a perfect classic.
With the urge to make the perfect batch of chocolate chip cookies on the last day of this past beautiful long weekend, I turned to William's Sonoma once again, searching for their idea of a perfect cookie. Though their perfect cookies looked very different from the ones that I drooled over in my old book, I figured it would be a good start in terms of recipe development. To make the cookies a little bit more of my own and closer to my idea of perfection, I chose to swap some of the semi-sweet chocolate chips in the recipe for shards of chopped 90% Lindt Chocolate, as well as subbing part of the vanilla extract for bourbon, and topped them all off with one of my favourite ingredients, Maldon Salt.

Though I truly thought it would take me a few tries to get to achieve my perfect cookie, I am so happy to say that this recipe is it! I know I'm often prone to hyperbole, but the fates of the world were kind enough to deliver perfection to me. With crisp, slightly caramelized edges, chips of chocolate to bite into, with little bits of dark chocolate throughout, a soft interior that doesn't crumble when you bite in, and, of course, that crunchy, clean-salty taste from the Maldon Salt, these thin wonders are my idea of perfection. What's your idea of a perfect chocolate chip cookie? Try mine and let me know what you think! Tweet me your thoughts: @thisgingerrose.
Note: I like to use a quick-release cookie scoop for dropping my balls of dough onto the prepared baking sheet to keep my hands clean and create uniform cookies. 

Adapted from Williams Sonoma 
Ingredients:
1 1/4 cups all purpose flour 
1 tsp baking soda
1/2 tsp kosher salt
1/2 cup unsalted butter, softened
1/2 cup firmly packed brown sugar
6 Tbsp. white sugar
1 large egg
1/2 tsp vanilla extract 
1/2 tsp bourbon
1 heaping cup semisweet chocolate chips
1/4 cup 90% Lint Chocolate, chopped into small shards
Maldon Salt for garnish

Directions:
  1. Preheat oven to 350ºF. Line a large baking sheet with a Silpat mat or parchment paper.
  2. In a large bowl, sift together flour, baking soda, and kosher salt.
  3. In the bowl of an electric mixer fitted with the paddle attachment, beat together butter with brown and white sugar on medium-high speed for 2-minutes.
  4. Add egg, vanilla extract, and bourbon and mix at medium-low-speed until well blended. 
  5. At low speed, add the flour in three-additions, scraping down the sides and bottom of the bowl before each new addition, and mix until just blended. Stir in the chocolate chips and Lindt shards. 
  6. Drop 1-Tbsp-sized pieces of dough onto prepared baking sheet, leaving 2-inches of space between each (see note). Bake for 10-13 minutes, or until golden. Remove from oven, sprinkle each cookie with a pinch of Maldon Salt immediately, and allow to cool slightly while on baking sheet (about 2-3 minutes), and then transfer to a wire rack to cool. Repeat with remaining dough. 

Tuesday, February 7, 2017

What We Dig - Fat Pasha


Two weeks ago I had the pleasure of joining the What We Dig crew for an afternoon of Israeli and Jewish eats, as we took on Fat Pasha on Dupont. Though I have been to Fat Pasha several times before (and have always loved my experience!), it was so fun to be able to talk about one of my favourite dishes there, their Whole Roasted Cauliflower, and get to try two fantastic dishes that I have never tasted before, all on camera! Truly, I had such a blast and hope to get the opportunity to do more videos like this soon! Check out my episode to learn about three amazing dishes to try at Fat Pasha, and hear me embarrass myself over and over again with bad dad jokes! Enjoy!

Have you ever eaten at Fat Pasha before? What's your favourite dish? Tell me about it in the comments or tweet me: @thisgingerrose.

Listening To:

Tuesday, January 24, 2017

Turkey & Dumplings Recipe

Last year I was introduced to what may possibly be the most comforting dish on the planet: Turkey & Dumplings. As you may know from my previous post on Turkey & Dumplings, I first had this Southern-inspired dish on my most recent birthday at the Toronto restaurant Omaw, and was totally taken by the fantastic contrast of flavours and textures represented in the dish. 

Chris and I promptly tried to recreate the dish in our own kitchen, and it turned out so ridiculously incredible! Of course, because we were playing around so much with the dish on our first go at making it, we weren't able to record a clear breakdown of the recipe. Alas, with such an amazing response from everyone on the photo that I posted of our Turkey & Dumplings copycat recipe, we had to give it another go, but this time carefully recording every step. 
So with that, I bring you our version of Turkey & Dumplings, a must-make recipe for any comfort-food lover! Last time we made this dish, we were lucky to have leftover Thanksgiving turkey on hand, so this time we decided to roast off some fresh turkey thighs, so that we could make this dish all year round. Thank you to The New York Times for providing a killer method for making roasted turkey pieces that taste like they came off of a whole-roasted bird! You can find our slightly modified recipe for roasted turkey thighs below as well. 

Tip: Save the turkey skin after roasting and fry into crispy chips to use as a garnish! 

Ingredients:
8 cups chicken stock (preferably homemade)
1 medium onion, small dice
2 stalks celery, small dice
2 medium carrots, small dice
3 garlic cloves, minced
1/2 cup fresh or frozen corn niblets
1 Tbsp. fresh thyme, leaves picked
3 Tbsp butter
3 Tbsp flour
3/4 cup roasted or smoked ham, diced
2 bay leaves
1/4 tsp cayenne pepper
1 medium/large parmesan rind
1/4 cup grated parmesan cheese
2 Tbsp. sour cream
about 2 cups shredded roasted turkey meat (dark meat) *see recipe below for roasting turkey thighs
kosher salt and pepper to season
Beurre Manie 
1 Tbsp. flour
1 Tbsp. cold butter
Dumplings (Tyler Florence Recipe)
2 cups flour
1/2 Tbsp baking powder 
1/2 tsp kosher salt
2 eggs
3/4 buttermilk

Directions:
  1. Set a large dutch oven on the stove set to medium heat.
  2. In a separate medium pot, heat stock to medium heat. 
  3. Add onion to dutch oven and heat. Add carrots and celery and sweat. Season with salt and pepper. Add corn, garlic, and thyme and cook until fragrant (about 30-seconds to 1-minute).
  4. Add 3 Tbsp. butter and melt. Add flour and stir to make a roux. Cook for about 1-minute.
  5. Slowly begin adding in the stock, one ladle at a time, while stirring to incorporate. 
  6. Add in ham, bay leaves, cayenne, and parmesan rind. Season with salt and pepper. Bring to a boil, reduce to a low, and simmer for 30-minutes. 
  7. Remove bay leaves. Add in grated parmesan cheese and sour cream. Taste and season as needed with salt and pepper. If mouthfeel is off and the soup is too thin, prepare a Beurre Manie. 
  8. To make a Beurre Manie: combine 1 Tbsp. flour with 1 Tbsp. cold butter and smoosh together with the back of a spoon. If you want, get right in there and smoosh it together with your fingers to form a paste. Drop the paste bit by bit into your soup and stir in. 
  9. Make Dumplings. In a medium bowl, whisk together dry ingredients. In a small bowl, lightly beat together eggs with buttermilk. Fold wet ingredients into dry ingredients. If it feels too tough, add in another few tablespoons of milk. Drop spoonfuls of batter directly into the soup. Simmer for 10-15-minutes, flipping part way through. 
  10. Stir in turkey and any drippings (you may also add in the garlic and onion that was roasted with the turkey thighs). Cook 5 minutes. Serve immediately. 
Roasted Turkey Thighs
(Slightly adapted from The New York Times)
Ingredients:
1/4 cup butter, softened
1 Tbsp. fresh thyme leaves
2 turkey thighs, washed & dried
salt and pepper to season
rosemary salt (optional)
1 Tbsp. olive oil
2 celery stalks, roughly chopped
1 medium carrot, roughly chopped
1 medium onion, quartered
4 garlic cloves, whole 
4 thyme sprigs

Directions:
  1. Preheat oven to 450ºF. 
  2. Stir together butter and thyme leaves and rub all over turkey pieces, making sure to get some underneath the turkey skin.
  3. Season generously with salt and pepper, and rosemary salt (if you have any!). 
  4. Toss celery, carrot, onion, and garlic with olive oil and season with salt and pepper. 
  5. Place thighs in a medium roasting dish or baking pan and tuck the celery, carrot, onion, garlic, and thyme sprigs around the meat. 
  6. Roast for 30-minutes. Reduce heat to 325ºF and roast for an additional 15-20-minutes, or until the internal temperature reaches 165ºF, while basting occasionally with accumulated juices. 
  7. Remove from oven and tent with tin foil for 30-minutes. Separate the meat from the bones and shred with 2 forks. Set aside in fridge until ready to use. 
Listening To