Showing posts with label vegan. Show all posts

Monday, March 18, 2019

Red Lentil Dahl

I've recently had a not so great realization that some of my favourite recipes, the ones that I've created myself and am the most proud of, often never make it to the blog. You would think I would be excited to share something that I'm proud of and want others to experience the joys of as well, but the fear of having my post not live up to the recipe that I am so proud of often stands in the way. 

Whether it's saying to myself "I'll post it next time when I get a better photo" or not feeling like I have the perfect story to tell before the recipe that will make the dish resonate with people, there's always road blocks that I put in my own way that prevent me from moving forward. 

There's something so much safer about putting a photo or a short story on my Instagram, for instance. On Instagram I have the option to let my photo expire after 24 hours, or put it in my grid, where it will inevitably get buried and be forgotten. Why does it feel safer sometimes to be forgotten? Why is there this constant push and pull within myself, between wanting to shine a light on my interests and passions and wanting to hide them away just for myself? It always comes down to fear; fear of not being good enough, fear of not living up to expectations that I have of myself or that others have of me, and fear of putting myself out there and trying and still maybe failing. 

Even though I was scared to sit down and write this today, I did it. Even though I was scared to write about fear in a post about Red Lentil Dahl, worried that people would wonder "what the hell does this have to do with dinner?" I did it anyway. Even though the photo I took was a quick, un-styled capture before I hungrily dove into my bowl, I posted it anyway. Even though I know that I can take a better photo or style a better bowl, I gave myself permission to not be perfect. Even though I'm worried that people may not think my recipe is authentic, I remind myself that I never claimed that it was, and it's delicious nonetheless. Even though I'm scared for people to read this and think that I'm weak for having these fears, I know the only way to move past them is to expose them and fight through them. I face my silly fears today because it will make them a little less powerful tomorrow. 

Red Lentil Dahl
This is one of my favourite go-to recipes for the mid-week rush! I love that this recipe is so quick and simple to prepare, and it also always results in leftovers for lunch the next day, as well as some to freeze for future emergency dinners! If you want this recipe to really go speedy, prep your mise-en-place in the morning, so everything is chopped, measured, and ready to go when it's time to get dinner on the table. 

Ingredients:
4 medium garlic cloves, small dice
1 Tbsp ginger, small dice
1-3 thai red chillies 
1 Tbsp lemon juice
2 Tbsp vegetable oil
1/2 tsp mustard seed
3/4 tsp whole cumin seed
2 small onions, small dice
pinch baking soda
1/2 tsp ground coriander
1/2 tsp ground turmeric 
1 tsp garam masala
1 can whole tomatoes, crushed by hand
1 can (400 mL) coconut milk
1 cup red lentils

Directions:
  1. Bash the garlic cloves, ginger, red chillies, and lemon juice in a pestle and mortar until it forms a loose paste. Set aside.
  2. In a large pot set to medium heat, add vegetable oil, mustard seeds, and cumin seeds. Cook until spices begin to sizzle and pop.
  3. Add onion and pinch of baking soda. Cook, stirring frequently, deglazing with a splash of water every few minutes until mixture is deep brown and very fragrant, about 10-minutes. 
  4. Add the garlic and ginger paste and cook for 1-minute.
  5. Add tomatoes, coconut milk and lentils and stir to combine. Season with salt. Bring mixture to a boil, then reduce heat to a simmer and cook for 20 minutes.
  6. Garnish with cilantro and serve with rice. 
Listening To:
Maggie Rogers - Back in My Body

Monday, September 10, 2018

Red Curry with Butternut Squash & Chickpeas

I never gave my mom enough credit with being able to put beautiful, delicious, and varying meals on our table every night of the week, in the midst of her crazy busy schedule. Now that I'm an adult and the primary cook in my little family of two (just Chris and I right now), I'm already feeling the struggle of finding the time to grocery shop and get a tasty and satisfying meal on the table each night of the week. I definitely have a few go-to meals that I turn to, and a new one that I've added into the rotation this year has been weeknight curries!

Curries are so incredible for weeknight meals for so many reasons. First of which, I love that most curry ingredients are items I already have kicking around my kitchen, which means not having to run to the grocery store before mealtime. I also love the ease and speed in getting a beautiful, restaurant-worthy curry on the table, not to mention how forgiving they are once reheated. Curries reheat beautifully, making them a fantastic option for weekend meal planning, as well as using the leftovers for lunches throughout the week, and freezing for future emergency dinners. Last but not least, they are so delicious and are a great excuse for enjoying a meatless meal. While curries are fantastic with chicken, beef, seafood, goat, and more, I tend to mostly make protein-packed vegetarian and often even vegan curries so that I don't have to go to the store to buy any additional meat.
I often draw inspiration for my curries from some of my favourite restaurant curries that I've enjoyed around the city. One of my favourites is the red curry from Sukhothai, which includes tender and sweet cubes of squash immersed in the flavourful sauce. With this curry on my mind, and local squash in abundance in the grocery store, I came up with a delicious and feel-good weeknight curry to add to my collection of homemade curry recipes. I often make curries on Monday's before our evening yoga class, so to give this dish a hit of extra protein to give me the energy to get through the class, I also added some chickpeas, that added a bit of texture to the dish as well. I know chickpeas are not traditional in a Thai curry, but for a weeknight meal it's more about creating a delicious and satisfying dish that works for me than going for authenticity.

I hope you enjoy this curry and add it into your own weeknight meal rotation! Let me know what you thought in the comments below.

Ingredients:
4 medium garlic cloves, minced
1-inch piece of ginger, minced
1 - 6 chillies (depending on your heat tolerance)
1/2 Tbsp cilantro stems, finely chopped
1 Tbsp lemon juice
1/2 tsp salt
1 tsp whole cumin seed
1 tsp whole coriander seed
vegetable oil for sautéing
4 large shallots, diced
pinch of baking soda
5 - 6 Tbsp red curry paste
2 - 2 1/2 cups butternut squash, cubed (you may sub in other types of squash if you wish!)
1 can (540mL) Metro Irresistibles Life Smart Chick Peas with no salt added, drained and rinsed
handful of kefir lime leaves (optional, if you can't get your hands on them, just add a squeeze of lime juice)
400mL coconut milk
1 cup vegetable broth
1 Tbsp lime juice
1-2 Tbsp fish sauce
pinch of brown sugar
1/4 cup fresh cilantro, chopped plus more for garnish
jasmine rice to serve

Directions:
  1. In a mortar and pestle grind together garlic, ginger, chillies, cilantro stems, lemon juice and salt until you form a paste. 
  2. Heat a large pot to medium heat. Add a glug of vegetable oil and add in the cumin and coriander seeds. Once the seeds become fragrant, add the shallots and pinch of baking soda. Increase heat to medium-high and cook, stirring frequently. Every two-minutes or so, deglaze the bottom of the pot with a small splash of water, using a wooden spoon to scrape the browned bits from the bottom of the pot. Continue this process for 7-10 minutes, or until the mixture becomes a deep brown colour. 
  3. Add in the prepared garlic paste, along with the red curry paste and butternut squash. Stir to coat and cook for 1-min. 
  4. Add the coconut milk, vegetable broth, chickpeas, and kefir lime leaves and bring to a boil. Season with salt and reduce to a simmer, and cook for 20-30 minutes, or until squash is tender. 
  5. Add the lime juice, fish sauce, brown sugar, and cilantro and taste for seasoning. Season as needed with additional fish sauce, salt, chillies, and brown sugar to balance flavours. 
  6. Serve with jasmine rice, garnished with lime wedges and cilantro sprigs. Serve immediately or keep in fridge for 1-week, or freeze for future use. 
This post was created in partnership with Metro Ontario. 

Listening To:
Roll (Burbank Funk) - The Internet

Monday, February 27, 2017

Jumping On The Buddha Bowl Bandwagon

Go on any health-focused food blog and you will find some version of a brightly coloured Buddha Bowl. Come to think of it, do a quick scroll through your Instagram on any given weekday, and you're bound to find an image of some sort of Buddha Bowl there as well. It's clear to see that everyone is doing the Buddha Bowl, and it was my time to jump on the mindful eating bandwagon!

I'm big on eating leftovers for lunch, but not every dinner leaves me with enough tasty leftovers that I can work into a full lunch, meaning that I often turn to unhealthy quick-fixes that generally leave me feeling guilty, lethargic, and not very satiated. With some time to spare one morning last week, I figured I would take the time to jump into some food prep to get my Buddha Bowl game on for the week! Though my fridge didn't feel stocked, it was easy to come up with enough ingredients to make a delicious and satisfying bowl that I would feel excited to eat a few days in a row. 
I started by cubing up some sweet potato, tossing it in some herbs and spices, and throwing it into the oven for 20-30 minutes to roast. While my sweet potato cubes were tenderizing in the oven, I whipped up a few servings of quinoa with some homemade vegetable stock that I had ready in the freezer, and tossed some canned chickpeas in some spices and heated them up on the stove. By the time I had some sugar snap peas and cilantro chopped, and a tahini dressing whirred in the blender, my sweet potatoes, chickpeas, and quinoa were all ready! It was just that easy and fast. Throw everything in a bowl, drizzle it with dressing, and sprinkle with cashews and you've got yourself healthy and satisfying lunches for days! This dish is so simple and easy, there's no need to include a recipe at all! I just listed the ingredients, and even that is up for you to play around with. Use whatever ingredients you have on hand to make your Buddha Bowl work for you! How do you Buddha Bowl? 

Ingredients:
cooked quinoa 
roasted sweet potato, cubed
spiced, warmed chickpeas
sugar snap peas, sliced on a bias
lightly salted cashews
cilantro, finely chopped

Directions:
  1. Place quinoa in a bowl and top with sweet potato, chickpeas, and sugar snap peas. Drizzle with dressing and sprinkle over cilantro and cashews. Serve. 
Listening To:

Monday, November 14, 2016

The Only Roasted Pumpkin Seed Recipe You Will Ever Need

Last week I started a new part-time job. It's exactly the type of malleable job that I was hoping to get, that would allow me the flexibility to work on my creative pursuits, while still learning and growing in the food industry. I was so happy when I was offered the position, feeling like my steel-toe-shoe-covered-foot was finally in the door! That feeling lasted...hmmm...all of maybe three days before my self-doubts began to set in. It's so hard to get excited about starting a new experience when you're a natural self-doubter, never trusting yourself and your abilities. 
"What the hell am I doing here?"
I have to be honest, I feel totally out of my element. It feels just like the first few weeks of culinary school, where I kept asking myself "what the hell am I doing here?" telling myself that I didn't belong and I was going to fail. Culinary school was definitely a humbling experience for me, but also an incredibly rewarding one. When I look at how much I grew in just the several select courses that I attended, and more than that, how much my confidence blossomed, I can't help but feel proud of myself. 
As much as I know there will be a light at the end of the tunnel, and that it's going to take time to find my groove and get comfortable, this beginning stage is absolutely excruciating to get through. I'm clumsy, I'm slow, I'm messy, I second guess myself, I can be forgetful, and my anxiety can get the best of me and I can slip into panic mode. 

It was the same when I first started serving - clumsy, slow, messy, second guessing myself, being forgetful, and I most definitely slipped into panic mode more times than I care to recall. I remember the look on my managers face when I would mess up an order. The nicest guy would suddenly look terrifying. That look would be burned into my soul as I saw it again and again as I helplessly tried to find my feet. 
"It's so easy to be comfortable and stay in a safe space where you know you can't fail, but if you can't fail then you can't grow."
I saw that same look on our head chefs face at my new job when we thought I almost used up all the chives that were meant for another recipe...and then again when we thought I almost broke the $1000 Vitamix, because I forgot to tell my group to remove the sachet before blending the soup...and oh, so much more. So, so, so much more! It's so horrible, and challenging, and stressful right now, and I want to cry just thinking about it, but it's always the most difficult and challenging experiences that end up being the most rewarding for me. Though I was a horrible, spastic server at first, I eventually became one of our most reliable and respected in the restaurant, a place I never thought I would get to. It's so easy to be comfortable and stay in a safe space where you know you can't fail, but if you can't fail then you can't grow. 
I'm so damn scared of embarking on this new endeavour, but I'm also so insanely eager to meet the Danielle that comes out of this experience. I know she will come out stronger, tougher, wiser, faster, and so much more confident than the Danielle that walked in. 
"The spicy makes the sweet all the sweeter, and so is the same in life."
Without the spicy and bitter life experiences, we would never have the sweet, which brings me to one of my favourite autumn recipes, my take on Martha Stewart's Sweet & Spicy Pumpkin Seeds (recipe here!). As I mentioned in the title, this will be the only roasted pumpkin seed recipe you will ever need, because no other recipe will ever come close to being this delicious! This will be the fourth or fifth mention of this recipe on my blog, because it's just that good! I can't get away from it! What makes these seeds so addictive is the contrast between the sweet and spicy seasonings. The sweetness of the sugar is brought to life thanks to the addition of fragrant sesame oil, and spicy cinnamon, ginger, and cayenne pepper. If these were only seasoned with sweet flavours, they would fall flat. The sweet needs the spicy to keep everything in balance. The spicy makes the sweet all the sweeter, and so is the same in life. 

Check out my slightly adapted version of Martha's Sweet & Spicy Pumpkin Seeds here! And if you haven't started watching Martha & Snoop's Potluck Dinner Party, you need to start RIGHT NOW because it is amazing!!! 

Listening To:

Wednesday, March 30, 2016

Cocoa & Raspberry Chia Seed Pudding

Image by me, Danielle Rose
We all have that number one insecurity that always seems to be lurking behind you any time you start to feel confident in yourself. For myself that number one insecurity has been my skin. Ever since high school and especially in university I have suffered from acne. Though it's had it's ups and downs with deep, dark, scary downs in university that often left me feeling such extreme self hate that I wouldn't want to leave my bedroom. I would fake sick just so I wouldn't have to go to work and have the beautiful people I worked with see my embarrassing skin. I would keep my head down in lectures to try to cover my face with my hair so no one would have to see my face. I remember bursting into tears while catching a glimpse of my reflection while out at a restaurant with my mom because I thought I looked like a monster. As extreme as this all sounds, and though my skin has drastically improved, I still have those days where I feel like a monster. 
Image by me, Danielle Rose
Through the many ups and downs with my skin I've learned that much of my skin issues have to do with my diet. Of course there's the obvious food no-no's for having clear skin like reducing the amount of alcohol I consume (thank goodness I hardly drink at all) as well as greasy and fried foods (damn, I love those!), but what I didn't realize was affecting my skin so much was dairy. Now if you know me at all you will know that cheese is my secret lover. We have had a passionate affair since I first tasted it and I refuse to ever let go. So if I'm going to be keeping my dear cheese present in my daily life, I'm going to have to be extra diligent about reducing all the other dairy I consume. 

With a new healthy diet on my mind since, you guessed it, January, I've been trying to curb my late afternoon foodie cravings each day with a yogurt and granola bowl as a way of upping my fruit intake as well as delivering other great health benefits such as probiotics, chia seeds, flax, and more. Though those yogurt and granola bowls were awesome for keeping me satiated throughout the day and gave me a great boost of energy, my skin was not happy with having all this dairy in my system. I started breaking out like crazy igniting the awful pattern of self hate that I'm all too familiar with.
Image by me, Danielle Rose
Thanks to my savvy Pinterest hunting, I was able to come up with an alternative to my fruit and yogurt bowls in the form of chia seed pudding. I have kept a steady supply of chia seeds in my kitchen ever since I first learned about its incredible health benefits, which include being packed with antioxidants, fibre, protein, and Omega-3 fatty acids. Completely flavourless and very tiny, chia seeds have been great for shaking into salads, onto my yogurt bowls, in smoothies, and so much more. More than just a garnish for adding a hit of nutrients, chia seeds are also fantastic thanks to their texture when moistened. Chia seeds are a lifesaver for vegans, as they are a fantastic egg substitute when stirred with some water and left to rest. When moistened, chia seeds expand and take on an almost gelatinous texture, giving them the ability to bind many different foods. The binding properties in chia seeds make them the magic ingredient in creating a vegan pudding, ie. chia seed pudding.
Photograph by Kristi Giambattista
Because chia seeds have no flavour, they are a wonderful base for pudding, allowing you to get creative and play around with different flavours. This time, inspired by a recipe by Minimalist Baker, I chose to make a cocoa flavoured chia pudding, seasoned with cinnamon, a little bit of sea salt, and a touch of maple syrup for sweetness. Chia seed pudding is insanely easy to make, just stir and let rest, that's it! It's ease of preparation means you can whip up a big batch on a weeknight and spoon them into individual jars, topped as you wish, so you can have a variation of chia puddings each day, all week long! Though it may not be quite as creamy and decadent as a traditional pudding, it certainly satisfies a craving for pudding thanks to the delicious combination of chocolate, cinnamon, raspberries, and coconut. I love that I can still have my easy and healthy afternoon treat each day, without worrying about how it will affect my skin. Give my chia pudding a try and let me know on Twitter if I've made you a chia convert. Tweet me: @thisgingerrose. 

The above image was photographed by the talented Kristi Giambattista. Check out more of Kristi's work on her website!
Recipe adapted from Minimalist Baker
Ingredients:
1 1/2 cups almond milk (I used Vanilla flavoured)
1/3 cup chia seeds
1/4 cup cocoa powder (I use Valrhona cocoa powder)
1/2 tsp ground cinnamon
1/4 tsp sea salt
agave syrup or maple syrup to taste (because I used the Vanilla flavoured almond milk, I didn't need to add much additional sweetness)
fresh raspberries
toasted coconut, for garnish
chocolate curls, for garnish

Directions:
  1. In a large mixing bowl, whisk together almond milk, chia seeds, cocoa powder, cinnamon, and salt. Whisk vigorously until well combined and no lumps remain.
  2. Taste and season with agave or maple syrup and additional cinnamon and vanilla, if needed. Stir to combine.
  3. Transfer to a jar and chill for at least 3-5 hours, preferably overnight.
  4. Spoon desired amount into a jar or serving dish. Top with fresh raspberries, toasted coconut, and chocolate curls and enjoy! 
Listening To:

Tuesday, April 23, 2013

Shrimp & Vegetable Summer Rolls

Armed with a new julienne peeler given to me by the Easter bunny herself (didn't you know the Easter bunny is a pretty redheaded woman from Toronto?...who happens to be my mother) I was ready to tackle a slew of new healthy recipes that I had begun collecting that all require the snazzy tool. On the top of my "healthy recipes to make" list? Shrimp & Vegetable Summer Rolls, light and fresh rice paper rolls filled with crisp julienned vegetables and jam packed with some of my favourite fresh herbs. Unlike deep fried spring rolls, summer rolls require no cooking at all, just a simple dip in warm water and the firm rice paper sheets turn malleable, and ready to fill with whatever filling you so choose. 

Dying to try out my new tool, I used carrots and cucumber as my initial inspiration to create this recipe. After picking up the veggies, all it took was a short stroll around my new favourite shopping ground, St. Lawrence market, to finalize the ingredients in the recipe. Wanting a big hit of freshness in every bite, I picked up some of my favourite fresh herbs, basil, cilantro, and mint. For a bit of crunch and substance, I chose kelp noodles as opposed to the more common rice noodles as a healthy alternative. I had first tried kelp noodles in the raw and vegan pad thai from Rawlicious, and was incredibly impressed by their interesting texture that gives you the same satisfied feeling after eating pasta noodles.  Also known as "sea tangle", kelp noodles require zero cooking and are made from kelp, an edible seaweed that is very low in calories. To contrast the crisp texture from the noodles and veggies, I wanted to add something creamy to my rolls. Creamy avocado, full of healthy fats, was an absolute no-brainer. Being on a bit of a seafood kick, I couldn't resist adding in some shrimp that I quickly thawed from the freezer. Picking the ingredients is of course the easy part, then came the production. 
In a matter of seconds I learned that my julienne peeler, the tool that inspired the whole recipe, was absolute garbage. The darned thing didn't want to slice anything but my thumb. I tried to prevail, attempting different techniques, and holding the carrots in different ways, but quite frankly, the peeler is just plain dangerous. A frustrated toss into the sink, and I had resorted back to my mandolin. You will notice that I don't list how much of each ingredient to put into each roll, this is because it's really up to you and what flavours and textures you want to stand out most, and how much you are able to comfortably wrap into the rolls. My first roll was a messy disaster, with the thin rice paper tearing, the filling bursting out all over my kitchen floor, while I quickly (and very unattractively, might I add) tried to catch whatever of the rice paper roll remained into my eager mouth. Although it seemed like a total waste at first, this initial mess of a roll actually helped me to quickly learn what I needed to adjust in the recipe. Another layer of rice paper, a little less kelp noodles and veggies, and a lot more herbs and I had the perfect balance of flavours and textures, as well as a perfect healthy snack! I was so incredibly happy with how my summer rolls turned out, sending off a care package of them to my mom, my sister, and my boyfriend, knowing that they would all love them just as much as I. I am happy to report that they did indeed share the love for the rolls, sending me many praises on my delicious work. I am looking forward to making these rolls as a refreshing snack all through the hot summer months! 

*I like to use VH Spicy Thai Chili sauce to dip my summer rolls into
Tip: Make this recipe vegan by omitting the shrimp!

Ingredients:
20 rice paper sheets (22cm in diameter)
a large handful mixed greens
about 3 medium carrots, julienned
about 1 medium cucumber, seeded & julienned
about 3/4 cup cilantro, roughly chopped 
about 3/4 cup mint, roughly chopped 
about 1/2 cup basil, roughly chopped 
1 large avocado, sliced
1 package kelp noodles
10 medium-sized cooked shrimp, halved
dipping sauce of your choice*

Directions:
  1. Fill a medium-large bowl with warm water, lay down a clean dry towel on your work surface, and set up all ingredients in a production line. 
  2. Dip one rice paper sheet into the warm water for about 5-seconds, or until malleable. Lay flat on the towel, and lightly dab dry with another clean towel. Dip a second rice paper sheet in the warm water until softened, and lay directly on top of the first sheet. Dap to dry. 
  3. Starting with the mixed greens, lay a small amount of each filling ingredient onto the roll, adding 1 shrimp to each roll, about 3/4 of the way up the roll. For the best flavour add lots of the fresh herbs, adding slightly less basil than the cilantro and mint. Gently fold the top lip of the rice paper over the filling, and fold the two sides in. Gently roll the rice paper to create a package with the filling inside. Taste. Repeat with the remaining ingredients. You should be left with 10 rolls (minus the sacrificial first taste-testing roll). 
  4. Chill until ready to serve with your choice of dipping sauce. Serve within the first 24-hours of making. 

Listening To:
Queen - Bicycle race

Powered by mp3skull.com
Dear Landlord, I want to ride my bicycle...

Tuesday, January 10, 2012

Cookin' Greens Sautéed Kale with Lemon & Chickpeas

I know I'm not alone when I say that I have a bit of a love/hate relationship with New Years Resolutions. I love the idea of starting fresh and becoming aware of and making a conscious effort to achieve your goals, but at the same time, it's easy to bring yourself down when you inevitably give up on those resolutions within a month or so. When sitting down to write out my resolutions this year (I'm convinced writing them down makes them more likely to happen) I made sure to set goals that, yes, pushed my boundaries and challenged me a little bit, but were still reasonable to incorporate into my life and daily routine. I got a little carried away this year, and ended up with quite a long list of goals, but one of the ones that I have remained the most aware of is to try and follow the alkaline diet. The alkaline diet is different from many of the popular diets you hear about because it is not very strict and is very forgiving. As I have mentioned in previous posts, I have an extremely acidic body, which has resulted in me dealing with lots of skin and stomach problems, so taking care to reduce the amount of acid I consume and increase the amount of alkaline-rich foods on a daily basis could potentially eliminate any health problems I have encountered in my life to date. With so many delicious natural foods rich in alkaline, there's really no excuse to not be able to follow the alkaline diet, even if your just upping your alkaline intake and keeping your acid as is. The real trick to following any diet is to educate yourself and be open to trying new flavours.

Not long ago I received an email from Cookin' Greens, a company setting out to make extremely healthy dark leafy greens more convenient to cook with for the average North American. Their line of frozen greens featuring spinach, kale, rapini, and more stands out among other frozen vegetable products on the market due to their commitment to health. Cookin' Greens takes great care in retaining as much vitamins and minerals from their vegetables as possible by taking it straight from the farm (from the moment it gets picked) to the freezer in less than 6 hours! Cookin' Greens had immediately caught my attention! Although I was looking forward to trying all of their greens, the one that stood out for me was their frozen kale. I had heard a lot about kale, and knew it as one of those fantastic super foods that everyone should eat, but had never actually tasted the green myself, nor did I even know what the flavour was like. To be honest with you, I just assumed that I wouldn't like kale, so I never gave it the shot it truly deserved. Now was my chance! I took advantage of the sample they offered me and went to my local grocery store (I had no trouble locating Cookin' Greens at all!) and picked up a bag.

For my first ever kale recipe, I wanted to keep it simple so I could get an idea of the flavour and texture of kale for future recipes. Because I had never eaten kale before, I decided to begin with a recipe and taste and adjust the ingredients to my own taste from there. After just attending the Best Recipes Ever Set, which features all Canadian Living recipes, I was inspired to give one of their kale recipes a try, Lemon Kale with Chickpeas. This recipe was super easy to execute, especially with the help of Cookin' Greens frozen kale, which allowed me to save a huge amount of time and prep work. In next to no time my side was ready...but not quite complete just yet. After tasting the final dish, I felt that it was missing something, I wanted to add another bit of texture to the dish and perhaps a little spice. For texture and fantastic nutty flavour, I lightly toasted some pine nuts to stir in, along with some paprika to give the dish that little kick I was looking for, and alas my dish was complete! I couldn't have been more happy with how the dish turned out. Tangy, comforting, and delicious, who would have thought I would enjoy something so incredibly healthy! It's one thing to like the first bite of a healthy dish, but I have a tendency to get sick of most super healthy foods part way through eating my portion, I was extra nervous of this when I saw how much I had accidentally made, a ton! Thankfully I adored this dish all through the week as I snacked on it and brought it into work each and every day until it was done...which surprisingly didn't take long! I now feel confident that I can make kale part of my weekly routine all year long thanks to the incredible convenience and health benefits to Cookin' Greens! Go me!

Click here to see a chart on restoring the pH balance in your body and following the alkaline diet!

Ingredients:
3 tbsp olive oil
1 small onion, finely chopped
2 garlic cloves, finely chopped
1/4 tsp salt
1/4 tsp pepper
1/2 cup water
2 cups Cookin' Greens Frozen Kale
zest of half a lemon
1 cup cooked chickpeas, drained and rinsed
1/4 cup pine nuts, lightly toasted
1/4 tsp paprika
3 tbsp lemon juice

Directions:
1. In a pot, heat 2 tbsp of the oil over medium heat. Cook the onion, garlic, salt and pepper for about 4 minutes or until softened.

2. Add 1/2 cup water and bring to a boil. Reduce heat back down to medium and add kale and lemon zest and cook for 5 minutes.

3. Stir in the chickpeas, pine nuts, paprika and lemon juice and cook over medium-high heat for about 2 minutes or until no liquid remains. Drizzle with remaining oil and serve.

Listening To:
Dents De Lait, Dents De Loup - Serge Gainsbourg et France Gal

Powered by mp3skull.com

Monday, August 15, 2011

Tomato and Cucumber Quinoa

In my last post I talked about the woes of being in a dinner routine rut and suggested some ways to get yourself the heck out of it. A great way to get out of the dinner routine rut is to pick up an unfamiliar ingredient from the grocery store, as I had done with my Tangy Lemon Halibut, but what do you do if you can't make it to the grocery store? Do not fret my friends, because this actually gives you a wonderful advantage at getting out of that rut! We've all been there, you know, when you come home starving and declare, often with a dramatic groan, "there's nothing to eat!", but really what you mean is "I can't think of anything to eat." It's at that moment that you can either become grumpy, give up and order in, or take the high road and allow your creativity to be ignited!

I needed to serve something alongside my Tangy Lemon Halibut but unfortunately I was faced with a near-empty fridge. Hmmm halibut and pickles? That won't work. Halibut and cheese? Not a chance! Halibut and dip? Ok, time to hit the pantry! I turned to a great pantry standby, the healthy super grain quinoa to beef up the meal. I looked at the few veggies we had on hand, as well as some dried fruits and nuts and began to jot down which flavours go together, always keeping in mind the saying "what grows together goes together". I finally settled on something super simple but still tasty and healthy and worthy of going back for seconds for. My Tomato and Cucumber Quinoa features ingredients that my family and I have grown in our own garden, juicy tomatoes, crisp cucumber, and of course my favourite addition, fresh herbs to brighten up all those summer flavours. Stir in a simple dressing and you've got one yummy side that you've whipped up in no time at all!

Tip: Because this recipe is so simple you can easily switch it up to add whichever veggies and herbs you happen to have on hand. Play around with different flavour combinations and ways of preparing the dish. Why not roast your vegetables before adding them into the quinoa for a more complex flavour? Play!

Ingredients:
1/2 cup uncooked quinoa
1 cup water
1/4 tsp salt
1 small tomato, diced (or about 1 cup of halved cherry tomatoes)
1/3 of a cucumber, diced
1 1/2 tbsp fresh cilantro or basil, finely chopped
2 tbsp chives, finely chopped
about 3 tbsp red wine vinegar
about 2 tbsp olive oil
salt and pepper to taste

Directions:
1. In a small pot stir together the quinoa, water, and salt. Set to high heat and bring to a boil, then cover and simmer at low heat for 10 minutes. Let sit for 5 minutes then fluff with a fork.

2. Transfer quinoa to a bowl and allow to cool to reach room temperature. Stir in the tomato, cucumber, cilantro, and chives. Add the red wine vinegar and olive oil a tablespoon at a time and taste after each addition. Add as much as you feel necessary. Season with salt and pepper and serve. May be refrigerated and served the next day.

Listening To:
Jay-Z and Kanye West - Murder to Excellence

Powered by mp3skull.com

Sunday, July 24, 2011

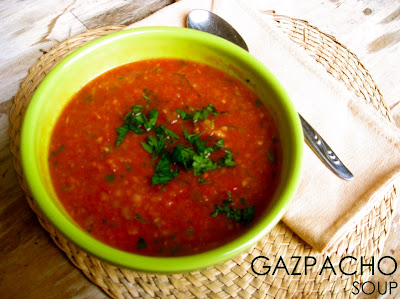
Gazpacho Soup

With the heat flying off the charts in Toronto this past week, it's easy to neglect any type of cooking altogether and rely solely on restaurants, takeout, fast food, and even excessive snacking for your meals. Before you decide to break your summer diet and budget (let's face it, with the AC jacked up to make your home livable, your budget is likely already broken) consider the many delicious cook-free meal options that you can quickly and easily make in the comfort of your own air conditioned home.

Last week when it was just too excruciatingly hot to have a heavy meal and heat up the kitchen, my mom and I decided to collaborate on a gazpacho soup recipe. Jam packed with fresh and vibrant vegetables and bright and flavourful fresh herbs right from our garden, our gazpacho soup was the most perfect option for a scorching summer day. I've always been one to turn my nose up at the raw food movement, but with a no-cook soup as delicious as this, perhaps I've become a new convert!

Tip: Have any other veggies on hand that you'd like to use up? Toss those babies in as well!
Tip: This soup would be perfect for your next party when served in glass shooters for your guests to walk around and sip on.

Ingredients:
1 green pepper, cubed
1 yellow pepper, cubed
1 large cucumber, peeled and cubed
1 small onion
1 (28 oz.) can diced tomatoes
juice of 1/2 lemon
3 cloves garlic
1/4 cup olive oil
2 tbsp red wine vinegar (or to taste)
about 2 tbsp fresh parsley
about 1 tbsp fresh dill
about 1/2 tbsp fresh chives
19 ounces tomato juice
1/2 tsp chili powder
salt and pepper to season

Directions:
1. In the bowl of a food processor or a blender, process the peppers until finely chopped (I like to leave the peppers a slightly chunkier than the other veggies to add a bit of texture), transfer to a large bowl. Repeat with the cucumber, onion, and canned diced tomatoes, adding each in turn to the large mixing bowl.

2. Add the lemon juice, garlic, olive oil, red wine vinegar, parsley, dill, and chives to the bowl of the food processor and pulse until smooth (you may add some tomato juice if the blade is unable to catch the ingredients in the bowl). Add to the large mixing bowl.

3. Add the tomato juice and chili powder to the large mixing bowl and stir. Taste and season with salt and pepper and, if needed, any additional red wine vinegar. Chill for several hours. Serve with fresh chopped dill as a garnish.

Listening To: Wash - Bon Iver

Looking for more no-cook recipes? Come on down to Lomography this Thursday July 28th from 3-5 for a live summer entertaining cooking demo analogue style from yours truly! Click here for more details!

Tuesday, July 5, 2011

Summer Fresh Recipe: Mediterranean Roasted Vegetable Hummus

I'm always looking for new, quick, and easy recipes and tips for entertaining, so when Summer Fresh Salads (one of my favourite prepared salad and dip brands!) asked me to create an affordable and easy recipe for entertaining using their Summer Fresh Hummus, my foodie wheels began turning at a remarkable speed. I started filling up my notebook pages with all sorts of wild ideas using Summer Fresh's delicious hummus. Despite how many ideas I had come up with, none of them seemed right to me. Although I've never thrown a party on my own, I've helped out at numerous parties thrown by my friends and family, so I know just how hectic preparing a party menu can be. Luckily I've picked up a few tips after helping out with all those parties. One of the most beneficial tips being to come up with a party menu that you can prepare in advance, allowing you to have fun with your friends and not be trapped in the kitchen all night long. It was this crucial tip that led me to come up with my Mediterranean Roasted Vegetable Hummus.
I wanted to create a recipe that was big on flavour, could be served at any temperature, and could be snacked on all party long. My Mediterranean Roasted Vegetable Hummus fit the criteria perfectly. With the prep as simple as a quick chop and toss, this recipe is crazy easy to prepare, and because it can be served at any temperature, you can easily make this dip a day or two before, and simply scoop it into a serving dish and garnish when it's time to serve. Another tip that I've picked up for entertaining, is to take advantage of store bought food. No this doesn't mean your whole menu should come right out of the prepared foods section, it just means you should look to prepared foods as your aids, and build your own dishes from there. Using Summer Fresh Original Hummus as my one prepared food aid and my inspiration, I brainstormed which flavours make hummus sing. I thought of a falafel and all the delicious toppings they serve along with it, roasted eggplant being one of my favourites! As soon as eggplant entered the equation, I immediately knew what I wanted to prepare. The slightly chunky, herbaceous, roasted vegetable mixture complete with smokey eggplant, sweet bell peppers, and zesty red onion is the perfect contrast against the smooth, creamy, and garlicky hummus. Serve with fresh or toasted pita chips to scoop both dips into every bite for the ultimate summer dip! Check out my recipe, along with 9 other Canadian Food Bloggers recipes, on the Summer Fresh Facebook page and "like" your favourite recipe (ahem...perhaps a certain Mediterranean dip...hint hint, nudge nudge) to receive a Buy 1 Get 1 Free coupon from Summer Fresh and a chance to win a party for 20! What are you waiting for? Check out all the recipes here!

Listening To:
The Smiths - Unloveable

Powered by mp3skull.com

Thursday, March 24, 2011

The Perfect Baked Potato

If you've read my last few entries, you will know that I am currently on a bit of a mission, trying to push my boundaries and take chances in the kitchen as frequently as I possibly can. I've already had a few ups and downs in the process, but the more I cook and push myself, the more I learn how to avoid those "downs". So far from what I've learned, the biggest piece of advice I can give you is to start with the basics and build from there. Look at a recipe that you may find intimidating and break it down into parts. Take it each part of the recipe and learn to execute it in the most simple and effective way. Once you've done that, I promise you your confidence will skyrocket, and you'll feel ready to take that recipe further and begin experimenting on your own.

To help you get to that skyrocketing confidence, I'm starting a series on Ginger Rose on kitchen basics. I want to feature basic recipes and techniques that I think are essential for any cook to know, and break them down to show you the simplest and most effective way to execute it. From here I'll provide tips and tricks to help you take that basic recipe and begin experimenting on your own!

To begin the series, I want us to focus our attention on one of the tastiest and definitely most comforting vegetables, the potato. I've been baking, frying, and boiling potatoes for years, but in all those years I had never bothered to research the absolute best way to make the perfect baked potato. So here you have it, a step-by-step guide on how to make the perfect baked potato!

Choose Potato
  • In order to make the perfect baked potato, you must choose the perfect baking potato. You are looking for a white and starchy potato here, you may either use the ones in the grocery store specifically marked as "baking potatoes" or look for any type of Russet Potato
  • Inspect your potatoes and pick ones that are firm and free of sprouts
  • Choose medium-large potatoes, depending on how big your meal is
  • Make sure all your potatoes are all the same size so they all bake at the same speed
Prep Potato
  • Wash and scrub your potatoes to remove any excess dirt
  • Using a fork, poke holes in your potatoes, about every inch or so, to allow steam to vent. DO NOT FORGET THIS STEP or else you will have a potato explosion
  • Using clean hands, rub your potatoes with olive oil and sprinkle with coarse salt. This will help to create a tasty and tender skin. This is important because most of the potatoes nutrients lies just below the skin, so you want to encourage your diners to eat it!

Bake Potato
  • Preheat oven to 325º
  • Place prepped potatoes directly on oven rack
  • Bake for about 90 minutes, or until potato is tender
  • To check for doneness, pierce potato with a knife, if there is little resistance and potato feels soft, it is done
  • Remove potatoes from oven, and serve!

Top Potato
There are many different toppings and mix-ins that are fantastic to add to a baked potato and can easily turn your simple side dish into something really special! You can even set up a potato topping bar at your next dinner party! Here are some suggestions:
  • butter
  • salt & pepper
  • sour cream
  • cheese (grate hard cheeses and cut soft cheeses into little bits to allow to melt on top)
  • bacon
  • fresh herbs (chives, mint, basil, parsley, lemon balm, rosemary)
  • chili
  • salsa
  • guacamole
  • black beans
  • cream cheese or mascarpone cheese
  • caramelized onions
  • green onions
  • steamed broccoli
  • green peas
  • sauteed mushrooms
Listening To:
Jimi Hendrix - Foxey Lady

Powered by mp3skull.com

Thursday, March 3, 2011

Asparagus & Green Pea Quinoa

March is here, and that means Spring is just around the corner...which also mean I have to stop coming up with excuses as to why I have been devouring so much unhealthy garbage (who orders poutine at 9:30 PM after downing a massive meal at home? This girl! Gross!). I'v been stuffing my face for the past few months, justifying each bite by telling myself that it's to put meat on my bones to stay warm, or to get my curves back...well the curves are back, but they don't exactly want to fit back into my jeans...great. With only a part-time job and a blog that ain't making this gal any dough (I love puns: insert laughter here), I can't afford to buy new pants to fit new curves, so I had to brainstorm to come up with a list of healthy, yet delicious and satisfying dishes that will keep me away from poutine...and chips and dip...and desserts...I could keep going! Immediately I turned to quinoa.

As I mentioned in a previous post on my Butternut Squash and Cranberry Quinoa Salad, quinoa is a super grain that is packed with protein, essential amino-acids, fiber, magnesium, and iron. Don't walk away after reading how healthy quinoa is because it is also delicious! Quinoa has a fantastic nutty flavour and texture that will keep you coming back for more! My Asparagus and Green Pea Quinoa is the perfect dish to get you pumped for Spring. Asparagus and sweet green peas add a crispy texture to each bite, as well as injecting the dish with familiar Spring and Summer flavours. The lemon vinaigrette ties the dish all together with it's zesty and fresh punch of flavour. Because my herb garden still has a ways to go before any basil can get growing, I used dried basil, but fresh basil or even mint would take this dish to new heights! This is also a great dish for Spring entertaining. Perfect for all vegetarians, celiac, and even vegans this dish could make its way onto your party table more than once! Quick and easy to prepare, with the option of preparing in advance, this beautiful dish with its hints of bright green will make a wonderful addition to your next party spread.

Ingredients:
1 cup quinoa
1 1/2 cups cold waterJustify Full
1/2 tsp salt
1 tbsp olive oil
1 red onion, chopped fine
1 pound asparagus, chopped
salt and freshly cracked pepper
4 fresh basil leaves (or fresh mint leaves), chopped fine (or 2 tsp dried basil)
1 cup frozen green peas

Lemon Vinaigrette
about 1/2 cup olive oil
zest from 1/2 of a lemon
1/2 tbsp red wine vinegar
1 tbsp lemon juice
salt and freshly cracked pepper

Directions:
1. Pour quinoa into a fine sieve resting in a large bowl. Fill bowl with cold water so that it covers the quinoa. Soak for 15 minutes. Using your hands, swish the quinoa around in the water. Strain and pour into a medium-sized pot. Add the water and 1/2 tsp salt.

2. Bring to a boil, cover with a tight fitting lid, and turn heat down to simmer. Cook for 15 minutes. Turn the heat off and, with the lid still on, let rest for 5 minutes. Fluff quinoa with a fork

3. While the quinoa is cooking, prepare the vegetables. In a skillet heat the 1 tbsp olive oil. Add the onions and saute at medium-high heat, stirring often, until translucent.

4. Add the asparagus, salt and pepper, and basil (if using dried basil) and saute, stirring often, for 4-5 minutes, or until asparagus is tender but still crisp. Add the green peas 2 minutes into the asparagus cooking. Remove from heat. Add to fluffed quinoa. Pour the lemon vinaigrette on top and stir to combine. If using fresh basil or mint, stir in now. Serve warm, cold, or at room temperature as a side dish with your next meal or on its own as a snack!

Lemon Vinaigrette
1. In a small bowl whisk together the lemon juice, zest, and red wine vinegar. While continuing to whisk with one hand, slowly drizzle in the olive oil. Whisk until mixture is well blended. Season with salt and pepper. Stir into quinoa mixture.

Listening To:
The Black Keys - Everlasting Light

Powered by mp3skull.com

Sunday, September 12, 2010

Fig and Goat Cheese Salad with a Honey and Balsamic Vinaigrette

Recently I developed a love for figs. For years I could never understand what was so great about this expensive fruit, and would stick to grapes and olives when a cheese plate would come my way. Well I'm making up for lost time now, experimenting with figs in any way I can when they make a rare appearance in my fridge. I even went so far as trying to create fig and goat cheese pancakes...an experience I will not be sharing with you...let's just say, you wouldn't want to try that one at home. My Fig and Goat Cheese Salad with a Honey Balsamic Vinaigrette was a much more pleasant experience for me. Satisfying, tangy, and sweet, this salad is great served as a side dish with your entree or even as a light meal on its own.

Note: Use your discretion on how much of the salad ingredients to add. It may vary depending on your taste and how many people you are serving it to.

Ingredients:
mixed greens
1/2 cup balsamic vinegar
1/4 cup honey
1/4 cup olive oil
figs, cut into quarters
red onion, very thinly sliced
goat cheese
dried cranberries
toasted pecans, chopped
salt and pepper

Directions:
1. In a small bowl, whisk together the balsamic vinegar with the honey until well combined. While continuing to whisk, slowly add in the olive oil in an even stream. Set aside.

2. Place desired amount of mixed greens in a large serving bowl. Top with figs, red onion, crumbles of goat cheese, dried cranberries, and toasted pecans.

3. Pour dressing over salad and toss until everything is coated. Season with salt and pepper, and gently toss again.

Listening To:
The xx - Heart Skipped A Beat

Powered by mp3skull.com

Thursday, September 2, 2010

Spicy Papaya and Brie Quesadillas

I have no idea when and where exactly my mom came across this recipe, but am I ever thankful that she did! Honestly, one of the best parts of my summer is when my mom makes her Spicy Papaya and Brie Quesadillas. Nothing beats sitting by the pool with a mango daquiri in one hand, and a spicy and exotic quesadilla in the other. And if you've had the privilege of lounging by the Rose family pool, munching on my mom's quesadillas, you know I'm not kidding! I know some of you may be thinking that this is too strange of a combination, or you may not like papayas, but trust me here, no life is complete without trying these. Ok I may sound a bit hyperbolic, but seriously, I have no doubt that you will fall head over heels in love with this quick and easy side. I know all of my friends and family have!

Ingredients:
4 medium-sized flour tortillas, or 6 mini
1 medium-large sized papaya, peeled and cut into thin slices
about 1 tbsp olive oil
1 onion, chopped
1/4 cup chopped jalapeno peppers (I used jarred jalapenos)
enough brie to spread on half of each tortilla (1 small wheel is enough to be safe)
sour cream (to serve)

Directions:
1. In a small pan, add olive oil. Once heated, add the chopped onion and jalapeno peppers. Sautee until softened and browned. Stirring occasionally.

2. While onion and jalapeno's are cooking, lay out your tortillas on a flat surface. Using a butter knife, carefully and evenly spread the brie onto half of each tortilla.

3. Top the brie-covered side of the tortilla with the sauteed onions and jalapenos. And then top that with the slices of papaya

4. Lightly oil a large baking sheet or line with parchment paper. Fold the empty side of the tortilla over all of your quesadilla ingredients, and transfer to baking sheet. Bake at about 300º for 6-8 minutes, or until brie has melted.

5. Cut into halves or quarters, and serve immediately with sour cream.

Listening To:

Friday, August 13, 2010

Carrot and Mango Salad with Honey Roasted Peanuts

Boy oh boy is it ever hard to stay healthy working at a pastry shop. This is especially true when you, being your economical self, try and bring in homemade lunches to work. Let me tell u a simple homemade turkey sandwich looks pretty sad next to a freshly baked ham and cheese croissant. So I've been looking for tasty and healthy dishes that will allow me to feel satisfied throughout my shift at work, are quick to prepare, and can transport easily. So when my mum brought home the recipe for Carrot and Mango Salad with Honey Lime Dressing from Food Network Canada's Just One Bite, I knew I had found my solution! This salad tasted amazing! I couldn't get enough of the incredible combination of the coarse textured carrots, the sweet and juicy mango, and crunchy sweet and salty peanuts, all topped off with a mouth-puckering honey and lime dressing! This is one salad that will be coming with me to work often! Sorry salad, I appreciate you coming to work with me, but I'm keeping the pay check!
Note: Just One Bite's recipe calls for raisins....but I just wasn't into that. But if you're a raisin fan, go on and add 'em! I also used honey roasted peanuts instead of dry roasted to tie in the honey in the dressing.

Ingredients:
3 large carrots
1 mango, peeled and diced
1/2 cup green onion, thinly sliced
1/2 cup honey roasted peanuts, coarsely chopped
2 tbsp cilantro, finely chopped
1 tsp grated lime zest
2 tbsp fresh lime juice
2 tbsp liquid honey
1/4 cup olive oil
salt and pepper to taste

Directions:
1. Using a cheese grater or a food processor fitted with the grater attachment, coarsely grate carrots into large bowl.
2. Add the mango, green onion, peanuts and cilantro to carrots.

3. In a small bowl, whisk together lime zest, lime juice, and honey. While continuing to whisk, slowly drizzle in the olive oil.

4. Pour dressing over salad, toss, taste, and season with salt and pepper.

Listening To:
The Arcade Fire - No Cars Go

Powered by mp3skull.com
(Going to the concert tomorrow!!)

Thursday, February 18, 2010

Blueberry-Apple Sauce


One of my biggest pet peeves is letting food go to waste. I've seen many people throw away produce because it's just not perfect anymore. Like apples that aren't quite as fresh and wouldn't taste good on it's own. Or blueberries that no one has touched in the fridge that you know will just go to waste in a matter of days. Well that is exactly what I encountered yesterday, apples and blueberries that needed to be used up before they went bad. There are so many easy things you can do with fruit in this stage. I didn't have a lot of time so I took the super easy route and made a Blueberry-Apple Sauce. Sweet and comforting on its own, and out of this world as a topping for ice cream! I topped french vanilla ice cream with the Blueberry-Apple Sauce, and added a sprinkle of my favourite granola cereal for a bit of a crunch. My new favourite dessert! Fast, simple, and healthy...and can we just admire that beautiful colour for a second...wow!
Tip: If you don't have fresh blueberries, frozen should work just as well.
Tip: Try using this sauce as a topping for oatmeal!

Ingredients:
5 medium apples, peeled, cored
about 1-2 tbsp lemon juice
about 1/2 cup blueberries
about 1/4 cup sugar
1/4 cup orange juice
cinnamon to taste (I put about 2-3 tsp)

Directions:
1. Chop apples into medium size chunks. Toss in a bowl with lemon juice.

2. Place all ingredients in a medium-large pot and place on stove at medium-high heat.

3. Let mixture come to a boil, then turn heat down to medium-low and let simmer for about 25 minutes, or until apples have softened.

4. Using a potato masher or food mill, crush the apples and blueberries until you have reached your desired consistency. Serve warm, at room temperature, or chilled, or even on top of your favourite ice cream!

Tuesday, November 3, 2009

Spiced Pumpkin Seeds


For years it has been a Halloween tradition for my family and I to carve out our pumpkins together, and to reserve all the slimy pumpkin seeds for me to roast off to make the perfect Fall snack, Spiced Pumpkin Seeds. Adapted from Martha Stewart's Sweet and Spicy Pumpkin Seeds, these seeds have the perfect balance between sweet and savory with just a hint of spiciness. I changed Martha's recipe slightly by reducing the amount of sugar, removing the cumin, and substituting sesame oil instead of peanut. The seeds are crisp with a light coating of nutty sesame oil and caramelized sugar, generously dusted with sweet sugar, salt, savory ginger, and spicy cayenne pepper. This snack is fast, simple, and perfect to take to class or work. These Pumpkin Seeds also make great gifts. Make up a large batch and present them in festive Fall tins or gift bags to give to friends, family, or co-workers.
Note: Roasting time may vary depending on oven. Be sure to keep an eye on the seeds during roasting. If they are undercooked, the seeds will be chewy. You are aiming for a golden brown colour.

Ingredients:
the seeds from one medium pumpkin (about 1 cup of seeds)
4 tbsp sugar
1/4 tsp salt
1/4 tsp ground cinnamon
1/4 tsp ground ginger
pinch of cayenne pepper (to taste)
1 1/2 tbsp sesame oil

Directions:
1. Preheat oven to 325º. Cut open top of pumpkin and scoop out seeds. Place them in a colander and and wash well with warm water, making sure to separate any pumpkin guts that may be sticking to the seeds. Once cleaned, dry them with a towel.

2. Evenly lay seeds out on a rimmed baking sheet. Bake for about 1 hour or until seeds become golden brown. Stir several times during baking. See above note on roasting.

3. In a medium bowl, combine 2 tbsp sugar, salt, cinnamon, ginger, and cayenne pepper.

4. In a medium skillet, heat sesame oil on high heat. Add the baked pumpkin seeds and remaining 2 tbsp sugar. Cook while stirring until seeds are coated in caramelized sugar.

5. Transfer caramelized seeds into bowl of spices and toss to coat. Let cool. Store in an airtight container for about 1 week.