Tuesday, November 30, 2010

Cranberry Pecan Oatmeal Cookies

Man is it getting cold in Toronto...yeah, yeah I know the last few days have been mild, but with some of my best friends sending me email updates several times a week, retelling stories of their travels in HOT HOT HOT Australia, I can't help but feel that cool Toronto chill a little more than usual. Although I consider myself to be much more of a savory food craver than a sweet one, it's cold, rainy, and windy weather like today that has me craving all things sweet. Not a day has gone by since the weather declined that I haven't stopped my parents, right in their tracks, and asked them if they happened to pick up a dessert on their way home from work. Pie? Cake? Donuts? Baklava? ANYTHING?! It's hard to hide the sound of desperation in my voice.

After all the times my mom thought of me on her way home, bringing me little pastries, a pie on sale, or a danish, I figured I owed her a dessert of my own. I decided to make this one a little bit more healthy to make up for all of the other sweets I had been consuming in the previous weeks. So I pulled out my trusty Williams Sonoma: Cookies cookbook to hunt for a great oatmeal cookie recipe. As I often do, I wanted to add my own little touch to their cookie recipe. Ever since not having pecan pie at Thanksgiving I haven't been able to get pecans off my mind, so I decided to substitute in pecans instead of the suggested walnuts. I also added in some dried cranberries. The cranberries were my favourite part as the beautiful deep red cranberry confetti added another textural element to the cookies, as well as a fantastic tangy flavour to cut the sweetness. The cookies were just what I was craving! Chewy, sweet, nutty, with a touch of tartness, the only thing you'll be craving after this is a warm blanket and a glass of milk.

Note: I also reduced the amount of nutmeg, as I am not the biggest fan of the spice, so feel free to add more to your liking.
Tip: Because these cookies are flecked with beautiful red cranberries, they would make great healthy holiday cookies!

Recipe adapted from Williams Sonoma: Cookies.
Ingredients:
1/2 cup butter
1/2 cup granulated sugar
1/2 cup firmly packed brown sugar
1 egg
1 tsp vanilla extract
3/4 cup flour
1/4 tsp baking soda
1/4 tsp cinnamon
dash of nutmeg
1/4 tsp salt
1 1/2 cup old-fashioned rolled oats
1/3 cup chopped toasted pecans
1/4 cup - 1/3 cup dried cranberries

Directions:
1. In a medium-large saucepan, over low heat, melt butter, then remove from heat. Using a wooden spoon, beat in both the granulated and brown sugar until blended. Add the egg and beat again.

2. Sift flour, baking soda, cinnamon, nutmeg, and salt together into a bowl. Stir flour mixture into egg mixture. Add the rolled oats, pecans, and dried cranberries and stir until combined. Cover and refrigerate for 1 hour.

3. Preheat oven to 350º. Grease a baking sheet or line with Silpat mat or parchment paper. Drop tablespoons of the cookie batter onto the sheet, making sure to space cookies at least 2 inches apart. Using a metal spatula or the palm of your hand, flatten each mound of batter. Bake cookies for 12-15 minutes, or until golden brown. For chewy cookies, let cool on hot pan. For crispy cookies, let cool on wire rack.

Listening To:
Can't Stop - Red Hot Chili Peppers

Powered by mp3skull.com

Sunday, November 28, 2010

Fried Zucchini

For all you out there that have become a fan of my Oma's cooking, here's another one for your books. Despite the fact that I think I would enjoy anything my Oma cooks...well...that is except for her pickled herring...ew...pickled herring (I cringe!). She has a handful of recipes that we have come to love as our favourites. You can bet that one of her all-star dishes will be on the table anytime you're invited over to her and my Opa's home. Although it's not too difficult to predict what the entree will be for dinner (especially with an Oma who wants to please everybody and may very well make a number of her specialties all at once!), it's always a bit of a guessing game as to what the sides and dessert will be. There are a few special side dishes and desserts that only show face a few times a year...and you never quite know when that will be. One special side dish in particular that I absolutely love snacking on is my Oma's Fried Zucchini.

Although my Oma doesn't make Fried Zucchini too frequently, that just may be one of the reasons why I love it so much. Eating Oma's Fried Zucchini feels like a special occasion, a special occasion that stirs up memories of my Oma's kitchen in her old house, with the screen door wide open, the sound of popping oil and the faint radio, the smell of batter being fried, and me leaning on the kitchen counter sneaking rounds of Fried Zucchini the moment they hit the paper towels to drain. With a memory so vivid, it wasn't too hard for me to replicate her recipe. With only a few ingredients, my Oma's Friend Zucchini is incredibly easy to make, although I added in an extra ingredient and seasoning step to evolve the dish a bit. Hot, crispy, and salty, with a hint of heat from the paprika, Fried Zucchini is sure to become your new favourite snack as well. The only issue you will run into with this recipe is keeping your friends and families hands away from them as they come off the griddle to cool. Nothing gets tummies growling like the smell of something being fried, so keep an extra spatula next to your work space to swat at people trying to sneak the zucchini before they have a chance to drain of their oils. Oma you have an open invitation to sneaking my Fried Zucchini anytime. This is a recipe that's meant to be served immediately, so unfortunately for the cook, you're going to have to be a bit of a sneak as well, and snack while you fry.

Tip: For fastest, easiest, and cleanest preparation, line up your work station in the following order before you begin frying:
  1. Sliced zucchini
  2. Flour mixture
  3. Batter
  4. Griddle with vegetable oil next to it
  5. Plate lined with paper towel
  6. Salt and pepper grinders
Ingredients:
8 oz. zucchinis, washed and trimmed
about 1/3 cup flour
1/2 tsp salt
1/4 tsp pepper
1/4 tsp paprika
vegetable oil for frying
salt and pepper to season

Batter
1/2 cup flour
1 tsp baking powder
1/4 tsp salt
1/4 tsp pepper
3/4 cup water

Directions:
1. In a medium-sized bowl, combine the dry ingredients for the batter. Add water and whisk together. Cover and let stand at room temperature for an hour.

2. In a shallow dish, combine the flour with salt, pepper, and paprika. Set aside.

3. Using a mandolin or a very sharp knife, cut zucchini into 1/8-inch thick rounds. Set aside.

4. Heat a griddle or large skillet to medium-high heat. Add a layer of vegetable oil.

5. Lightly coat several slices of zucchini in flour mixture. Carefully dip slices, one at a time, into batter and place on hot, well-oiled griddle. Make sure not to crowd the griddle or pan. Let slices fry for a few minutes, or until golden. Flip slices and fry until the other sides are golden as well. Place fried slices on a paper towel-lined plate and top with more paper towel. Lightly dab at slices with paper towel to remove excess oil. While slices are hot season with salt and pepper. Repeat with remaining zucchini slices. Serve hot.

Listening To:
What's My Name - Rihanna ft. Drake

Powered by mp3skull.com
You can't help but smile and shake your hips when this one comes on!

Friday, November 26, 2010

Canadian Food Blog Awards 2010

This past Sunday marked the kick off to the very first Canadian Food Blog Awards! Public nominations will run until December 21st 2010, when the finalists will be determined. Judging for all categories will take place from January 1st - January 25th. What a great way to promote the foodie community in Canada! Excited to learn about what other blogs are out there!

Tuesday, November 23, 2010

Broccoli & Fusilli

When I was little my mom used to take me to an art workshop that was held at Hazelton Lanes in Yorkville every month. Each month a new arts and crafts workshop would be held, everything from painting, clay sculpting, t-shirt making, etc. It was always one of my favourite days of the month, as it meant getting to spend one-on-one time with my mama, doing lots of fun arts and crafts aaaaand a special lunch out at Lettieri Cafe. Lettieri sells lots of in-house made sandwiches, baked goods, and prepared foods and when I was little I just couldn't get enough of their broccoli pasta. Every single time we would go to our art workshop, I would eagerly anticipate my broccoli pasta for lunch. I guess my mom didn't mind spending the money on rather overpriced prepared food when it meant me eating my vegetables.

I haven't had that broccoli pasta in years but it popped into my head the other day when I came home from work absolutely famished in a mad hunt for something to eat! It was the day before a big grocery pickup and it seemed like the only fresh thing in the fridge was a head of broccoli. I don't know about you, but when I'm starved like that, I don't exactly dream about eating a bowl of broccoli for lunch. I wanted something that would leave me feeling satisfied but still be healthy at the same time. It was then that memories of Hazelton Lanes art workshops and Lettieri flashed through my head, inspiring me to replicate their simple dish that I loved so much, but with a few additions of my own.

This is a really simple dish to make, not to mention incredibly fast because there is no real sauce. This is one of those times when you should use the best of the best. Because there's no sauce you need to make sure that all of your ingredients have as much flavour as possible. This means really fruity extra virgin olive oil, freshly grated parmesan cheese, freshly ground pepper, etc. Trust me, it will make all the difference. Lightly toasted pine nuts add texture and extra flavour. I also used whole wheat fusilli, which not only added extra health benefits, but also gave the dish a great nutty flavour.

Tip: Turn pepper grinder on a thicker grind for this one. You'll love that extra kick of pepper in each bite.
Tip: Need extra protein? Grilled chicken would taste great thrown in this mix!
Note: I don't have exact measurements here because there is really no need. This is something you an play around with and adjust depending on what you like.

Ingredients:
whole wheat fusilli
broccoli, florets and stems, chopped
extra virgin olive oil
butter
pureed garlic
parmesan cheese, freshly grated
pine nuts, lightly toasted (optional)
salt and pepper, freshly ground

Directions:
1. Cook desired amount of fusilli in salted water according to directions on package.

2. While fusilli is cooking, steam broccoli until fork tender but with a bit of a bite (you don't want mushy overcooked broccoli, you want that crunch). Once cooked, cut up broccoli into bite-sized pieces.

3. After pasta is cooked, drain and transfer back to pot. Add broccoli and drizzle with olive oil until pasta is coated. Add in some butter and garlic for flavour and toss. Grate over parmesan cheese and add the pine nuts (optional), toss together. Taste and season well with freshly ground salt and pepper. Serve with extra parmesan cheese on top.

Listening To:
Kanye West - Dark Fantasy

Powered by mp3skull.com

Sunday, November 21, 2010

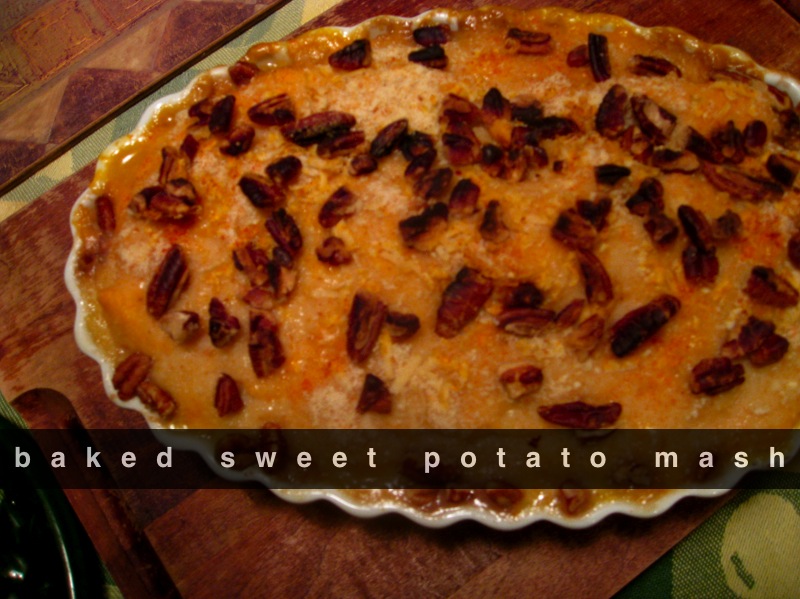
Baked Sweet Potato Mash

In my house, were really good about always serving at least one vegetable for dinner, but I find that we often put a lot of effort into the entree of our meal and don't really experiment much with our sides, particularly our vegetables. One of my favourite foods in the Fall is sweet potatoes, so it's not surprising that sweet potatoes can be found on my dinner plate at least 3 or 4 times a week. So one night for dinner this week, I decided to shake up our usual roasted or baked sweet potatoes by making a creamy and comforting sweet potato mash.

What was intended to be just a simple sweet potato mash turned into something much more interesting when our entree was a little behind schedule. The new rib recipe we tried seemed to be taking longer than we thought, so I had to stall my recipe so that I could still serve my mash hot and fresh. I decided to transfer the mash into a baking dish and top with some ingredients I happened to have on hand to add extra hits of flavour and texture. My Baked Sweet Potato Mash turned into out to be such a tasty dish! The sweetness of the buttery brown sugar sweet potatoes was cut by the saltiness of the parmesan cheese, with a little bit of crunch from the breadcrumbs and pecans, and a tiny hint of heat from paprika. Not only was this delicious as a side, the leftovers made for a perfect lunch to bring to work the next day!

Note: As you can see from the above picture, my pecans got a little burnt and my breadcrumbs are not very golden-brown. I made the mistake of pre-toasting my pecans, which had them browning up pretty fast with that second bake as the sweet potato topper. I had to cover the mash with tinfoil so that the nuts wouldn't burn anymore, which didn't allow for the breadcrumbs to crisp.
Note: This recipe can easily be made gluten free, just eliminate the breadcrumbs.

Ingredients:
4 sweet potatoes, peeled and cubed
1/2 cup half-and-half cream
3 tbsp butter
2 tbsp brown sugar
1/4 cup plain breadcrumbs
1 tbsp melted butter
about 1 tsp paprika
1/4 cup pecans
grated parmesan cheese to taste
salt and pepper to taste

Directions:
1. Put cubed sweet potatoes in a large pot of salted water. Bring to a boil on high heat, then reduce heat to medium-low, and partially cover pot with lid. Let cook on a gentle boil for 20-25 min. or until sweet potatoes are fork tender.

2. Drain water and place sweet potatoes back in pot. In a small saucepan, heat the cream with the butter and brown sugar. Add to potatoes and mash using a potato masher or add ingredients to a stand mixer and mix using the paddle attachment. Season mixture to taste with salt and pepper.

3. Pour mixture into a medium-sized greased baking dish. Place breadcrumbs in a small bowl and drizzle melted butter overtop. Combine using fingertips and crumble evenly over sweet potatoes.

4. Top breadcrumbs evenly with paprika, parmesan cheese, and pecans. Bake at 350º or until topping is golden brown. Serve hot or warm.

Listening To:
Paolo Nutini - Candy

Powered by mp3skull.com
(for my Robo in Australia!)